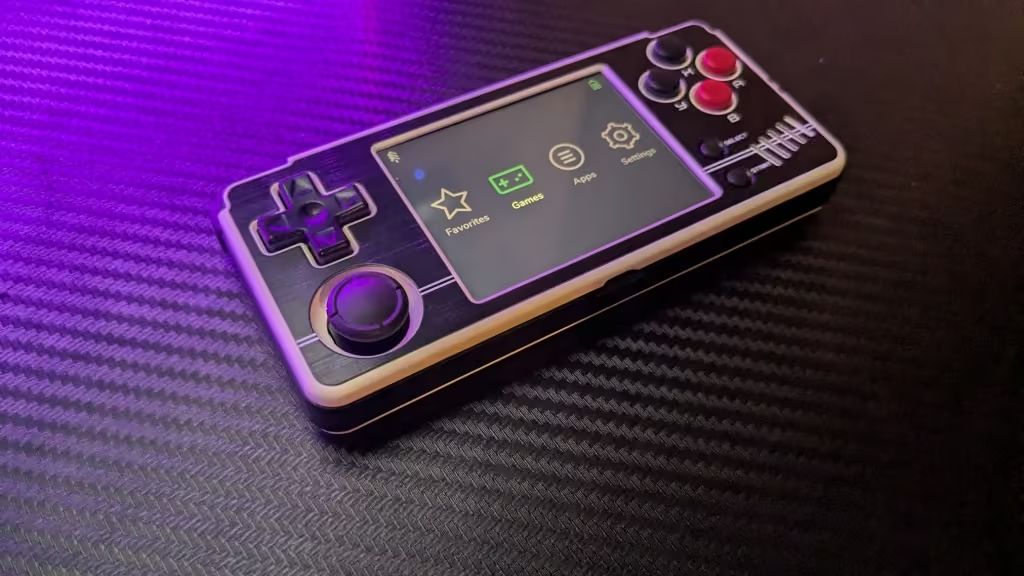
The Miyoo A30 arrived as something of a stop-gap measure in handheld releases. While Anbernic has been churning out devices almost monthly throughout 2024, Miyoo has remained fairly quiet.
The A30 emerged in April 2024 as a direct competitor to the Anbernic RG28XX. Both devices are small, horizontal, and pocketable, but their software experiences and hardware modules differ. Initially, the stock A30 experience can feel underwhelming to downright janky, but with a tiny bit of effort, it transforms into a go-to for small form factor emulation.
Table of Contents
Miyoo A30 Specifications
| Feature | Specs |
|---|---|
| Display | 2.8-inch IPS, 640 x 480 resolution |
| Processor | Allwinner A33 quad-core Cortex-A7 CPU |
| GPU | ARM Mali400 MP2 600MHz |
| RAM | 512MB |
| Storage | 16MB internal flash – expandable SD |
| Battery | 2,600mAh |
| Connectivity | Wi-Fi |
| Operating System | Stock/Spruce/MinUI |
| Dimensions | 127 x 58 x 15mm |
| Weight | 186g |
| Emulation | Up to PS1 |
Getting Started
- Required Tools and Materials
- Miyoo A30 Handheld
- PC
- MicroSD card (recommended: 64gb brand name card from a trusted retailer)
- MicroSD card reader
- Downloads
- Custom firmware of your choosing, e.g. Spruce/MinUI
- UPDATE: The release of Spruce Burner 1.0 allows users to format their SD card, download the latest OS image, and write the card all in one click.
- Software of your choice:WinRAR, Win32DiskImager, 7-Zip, MiniTool Partition Wizard, WinRAR, etc
- Your ROMs and BIOS collection
Stock Firmware
Using the stock firmware on the Miyoo A30 is…not a great time. It has improved somewhat since release, but it still isn’t an experience most users would prefer. If you’re still unsure about CFW, here are a couple of tips when poking around what the boilerplate version of the device looks like.
- How To Exit Games – During gameplay, you can press the HOME button (top left of the console, next to L2) to bring up the options menu.
- How to Save/Load – Pressing the HOME button will allow the user to access a save/load menu where the desired save/load slot can be accessed.
Backup Stock Firmware
-
Backup Your Data: Before you start exploring custom firmware options, take a moment to back up your stock card image along with any important files you may have added along the way.
-
Stock Firmware: If needed or preferred, the stock firmware for the Miyoo A30 can be downloaded from the official Miyoo website here.
Backup Using Win32DiskImager
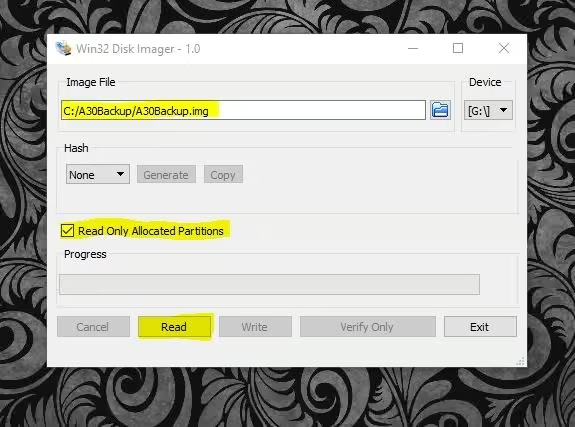
- Fire up Win32DiskImager: Click on the little folder icon under the “Image File” section and choose where you want to save the image output, remembering to add a .img file extension to your chosen filename.
- Choose the image: Choose the device drive you want to clone. *Be very careful during this process, or you can inadvertently erase entire drives you didn’t intend to.
- Read Only: Ensure that the box “Read Only Allocated Partitions” is highlighted, otherwise you will copy over any blank sectors of the drive along with the data.
- Create the Image: Click on the “Read” button and the software will begin creating the backup image file to the location you chose.

Write the contents of the stock SD card to an .img file
-
Format Your SD Card: Format your new blank SD card to FAT32 to ensure compatibility with the custom firmware.
Custom Firmware
Custom Firmware Options
-
-
Spruce: Per the devs, Spruce isn’t really a new OS, but rather “We think spruce is best described as being a beautification and optimization of the stock Miyoo OS that cleans up bloat, optimizes performance and focuses on aesthetics.” It’s very popular for its ability to mimic the OnionOS experience from the Miyoo Mini+.
- UPDATE: The release of Spruce Burner 1.0 allows users to format their SD card, download the latest OS image, and write the card all in one click.
-
MinUI: As the name would imply, MinUI is a minimalist CFW available for a variety of handhelds, including the A30. For a small device such as this one, some users may want as minimal a UI experience as possible. If all you’re looking for is to find your title and get to playing it in a competent manner, then MinUI has you covered.
-
Better Than Nothing (BTN): BTN is an under-the-hood overhaul of the Miyoo stock OS. It includes all the optimizations and pre-configured settings most users would want for an enjoyable emulation experience while keeping to the familiarity of the stock experience that some users may prefer.
-
Spruce Installation Instructions

Spruce running on the A30
*UPDATE: These steps are still a valid way to write the image, but for the sake of simplicity, the release of Spruce Burner 1.0 allows users to format their SD card, download the latest OS image, and write the card all in one click.
-
- Extract Firmware Files: Go to your downloads location and open the SpruceVxx.zip file with your software of choice (7zip, WinRAR). Extract the entire contents of the zip to a newly created directory on your PC.
- Insert SD Card: Insert your newly FAT32 formatted SD card into your PC and open it via File Explorer.
- Copy Firmware to SD Card: No image writing here! Drag and drop the contents of the zip file from within the directory you created, to the root directory of the SD card. Alternatively, you can just extract the zip directly to a fresh SD card.
- Eject SD Card: Safely eject the SD card from your computer.
- Insert SD Card: Insert the SD card into your Miyoo A30.
- Install: Power on your A30 and follow the on-screen instructions to complete the installation.
MinUI Installation Instructions

-
- Extract Firmware Files: Go to your downloads location and open the MinUIxx.zip file with your software of choice (7zip, WinRAR). Extract the entire contents of the zip to a newly created directory.
- Insert SD Card: Insert your newly FAT32 formatted SD card into your PC and open it via File Explorer.
- Copy Firmware to SD Card: No image writing here! Drag and drop the contents of the zip file from within the directory you created, to the root directory of the SD card.
- Eject SD Card: Safely eject the SD card from your computer.
- Insert SD Card: Insert the SD card into your Miyoo A30.
- Install: Power on your A30 and follow the on-screen instructions to complete the installation.
MinUI for Miyoo A30 Setup Guide
BTN (Better Than Nothing) Installation Instructions

Logo from the BTN Github
-
- Extract Firmware Files: Go to your downloads location and open the MinUIxx.zip file with your software of choice (7zip, WinRAR). Extract the entire contents of the zip to a newly created directory.
- Insert SD Card: Insert your newly FAT32 formatted SD card into your PC and open it via File Explorer.
- Copy Firmware to SD Card: No image writing here! Drag and drop the contents of the zip file from within the directory you created, to the root directory of the SD card.
- Eject SD Card: Safely eject the SD card from your computer.
- Insert SD Card: Insert the SD card into your Miyoo A30.
- Install: Power on your A30 and follow the on-screen instructions to complete the installation.
If you’ve noticed above, the method for installing firmware is the same across the different offerings for the A30. This is a drag-and-drop method via Windows Explorer, but other PC operating system procedures would be the same.
Adding ROMs and BIOS
- Insert SD Card: Insert your SD card back into your PC from the A30.
-
Navigate to ROMs Folder: Open the SD card directory and navigate to the ROMs folder
-
Copy ROM Files: Drag and drop the desired files from your PC storage to the corresponding folders on the SD card. NOTE: USA users may be thrown off by the ROM system directory names at first. Please note that all systems are labeled with their original names. So NES will be FC for Famicom, Genesis with be MD for Megadrive, etc.

Move your game ROMs into the corresponding console folder
-
Eject SD Card: Safely eject the SD card from your computer.
-
Insert SD Card into Miyoo A30: Insert the SD card back into your Miyoo A30.
-
Access ROMs: Power on your Miyoo A30 and navigate to the ROMs section from the main menu to access your transferred ROM files.
Wrap Up
So there you have it. The Miyoo A30, like so many other devices, is a great handheld so long as you apply the software support the emulation community has given it. Which CFW is right for you comes down to personal preferences. I like Spruce on this device, as I think it runs well and provides a familiar Miyoo experience that I like on their other devices, without all the bugs that haven’t been sorted with the stock firmware. The firmware process on this device is relatively painless, so get out there with your newly capable CFW sporting pocketable and get gaming.
What did you think of this article? Let us know in the comments below, and chat with us in our Discord!
This page may contain affiliate links, by purchasing something through a link, Retro Handhelds may earn a small commission on the sale at no additional cost to you.

