Scored yourself a new Brick, have ya? Congrats! The TrimUI Brick has proven a hit with reviewers across the board, and now that early adopters are getting their hands on units as well, it’s about time for some setup tips and tricks.
If you’ve set up a previous TrimUI device such as the Smart Pro, a lot of this should be familiar, but if you’re new to these devices, hopefully, we can this TrimUI Brick Setup Guide will make the initial setup as painless as possible.
Table of Contents
- TrimUI Brick Specs
- Required Materials
- Firmware Options
- Stock Firmware
- MinUI
- Knulli
- StockMix
- CrossMix
- Conclusion
TrimUI Brick Specs
- CPU: Allwinner A133P, 1.8GHz
- GPU: Imagination PowerVR GE8300, 660MHz
- RAM: 1GB LPDDR3
- Storage: 8GB eMMC, TF card up to 1TB
- Display: 3.2″, 4:3, 1024×768 IPS
- Wireless: Wi-Fi b/g/n, Bluetooth 2.1+EDR/4.2
- Audio: Front-firing stereo speakers, 3.5mm headphone jack, mono mic
- Battery: 3000mAh – Approximately 5-6 hours of life
- Ports: USB-C (charging, data, USB host), TF card slot
- Other: Vibration motor, RGB lighting, FN keys
- OS: TrimUI Stock Linux OS, MinUI, KNULLI, StockMix available
- Dimensions: 73.2 x 109.9 x 19.9/11.79 mm
- Weight: 159g
[button link=”https://rh-go.link/TrimUI-Brick_AE” color=”red” newwindow=”yes”] TrimUI Brick at AliExpress[/button]
Required Materials
- TrimUI Brick Handheld
- microSD card (Size is dependent on how much you want to keep on the device, but 64GB up to 256GB should work great)
- microSD Card Reader
- PC with internet access
- Firmware downloads for the desired custom firmware
Firmware Options
- Stock Firmware: The default firmware that comes pre-installed with the TrimUI Brick
- MinUI: Minimalist custom launcher and libretro frontend.
- Knulli Firefly: This is a fork development of Batocera Linux in pre-alpha development for the TrimUI Brick “Note: the TrimUI Brick is a pre-alpha version, and while many of its features are working, there are still many things to be fixed”
- StockMix: A new modified version of the stock firmware specifically for the Brick
- NextUI: Formerly known as “MinUI Next”, this community MinUI fork features “a rebuilt emulation engine and tons of added features for the TrimUI Brick”.
Stock Firmware
If you received a Brick without a pre-built microSD card, setting things up from scratch can seem daunting, but follow these steps below, and you should be throwing sonic booms in no time.
The Simple Method
This one is yet another example of the wonderful community of devs in this hobby. Helping out their fellow gamers before the manufacturer even acknowledges the device on their own website.
Head over to dev scatteredbra1n’s GitHub and follow the steps to set up a brand-new card for your device automatically. Thanks Scattered Brain!
Doing it the Old Fashioned Way
So if you’re running Windows 10 or 11, formatting a microSD card larger than 32GB can be a pain. Here we will use Raspberry Pi Imager because it’s free and available on all major operating systems.
- Download and install the appropriate version of Rasberry Pi Imager for your PC.
- Insert the raw SD card into your PC
- Open Raspberry Pi Imager and click Choose OS on the main screen
- Scroll down the options until you see “Erase – Format FAT32” and click

Format that drive - Next, under storage, click “Choose Storage” and select the SD card to be formatted.

Make sure to ONLY select the intended SD card - Unpack the zip FW file sd_recovery_tg3040_brick_ver1.0.5_20241105.zip you downloaded from here to a destination folder of your choosing.
- Write the image in Raspberry Pi Imager by selecting Choose OS and scrolling down to Use Custom

Select Use Custom - When prompted if you’d like to apply OS customization settings, select NO. Confirm that by writing the image you will lose any previous data on the card.

Image written - Remove the SD card from your PC reader and insert it into the Brick. Allow the installation process to finish. This can take some time, so be patient.
- After installation of the OS is complete, remove the card, and reinsert in your PC.
- Drag and drop ROM and BIOS files (please don’t ask us where to find these) to their respective directories on the card.
MinUI
- Download Firmware Files: Grab the latest version of MinUI from the GitHub repository.
- Unpack the Zip Files: Open up the MinUI zip archive and locate the MinUI.zip and the folder for the Brick.
- Copy Files: Copy the “trimui” folder and “MinUI.zip” (without unzipping) to the root of the SD card. *DO NOT unpack the MinUI.zip to the SD. Copy the whole archive.

- The root of your SD card should only contain the TrimUI folder and MinUI.zip as seen below.

- Allow Firmware to Install: Power on the Brick and you should be greeted with a dialogue that MinUI is being installed.
- Load Up the SD Card: Now, remove the SD card from the device and re-insert it into your PC. You should now be met with the root of the SD card, which contains three directories. Bios, ROMs, and Saves.

Drag and drop the desired files into their appropriate folders within the Roms/Bios directories (We cannot tell you where to find ROMs or system Bios). Load up the card, put it back in the device, and game on.
Knulli
- Download Firmware Files: Grab the latest version of Knulli from the Github repository.
- Extract the Archive: Use Winzip/Winrar/etc to unpack the compressed image file
- Prepare the MicroSD Card: Insert the MicroSD card into your computer’s card reader. In Windows, right-click on the desired drive and click Format. Under “File System” select FAT32. You can choose a quick format to speed things along, as we don’t need DoD levels of drive cleaning. Click “Start” to begin formatting the drive. This step isn’t 100% necessary when writing an image, but in my experience, it does help alleviate any unexpected issues.
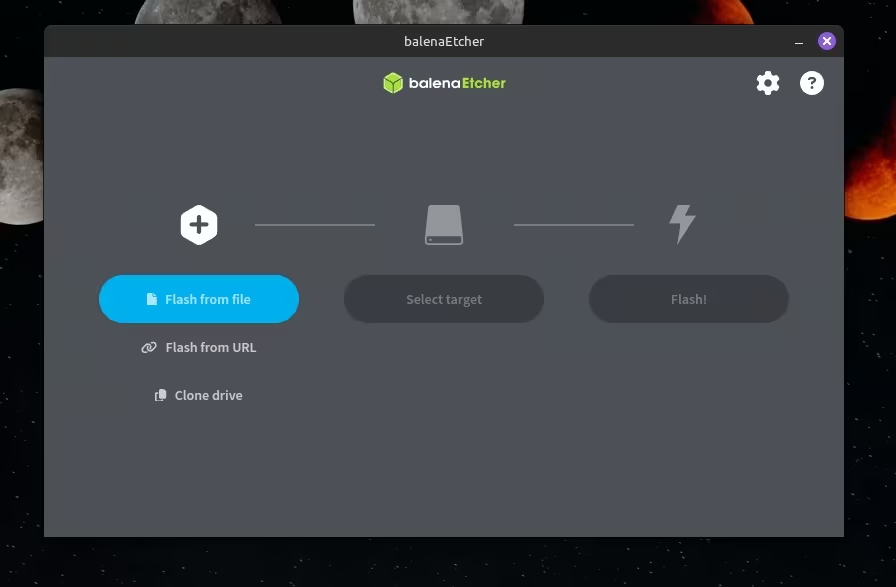
- Write the Image: We will write the image here using Balena Etcher, but most image writers will work. Other options include Raspberry Pi Imager, Win32DiskImager, etc. Linux users can format directly from the Disks application.
- Choose “Flash From File” and navigate to your downloads folder, which contains the Knulli .img file.
-

Choose flash from file and select your Knulli image - Click on “Select Target” and choose your desired SD card location for the image file to be written. *Take care in this step as you can potentially erase unintended drives if you’re not paying attention.
- Flash away! Once you click the “flash” button Balena Etcher will begin writing the image to the SD Card.
- Insert MicroSD Card: Once the image has finished writing in Balena Etcher, eject the MicroSD card from your computer and insert it into the TrimUI Smart Pro.
- Allow Firmware to Install: Power on the TrimUI and you should be greeted with the Knulli logo and a progress dialogue at the bottom of the screen. The OS is currently installing.
- Complete Installation: Once the CFW firmware install process completes, the device should reboot and load into the Knulli OS. You’ll even be greeted with some fun menu music to let you know you’ve been successful in your CFW journey.
StockMix
StockMix is a new community fork of the TrimUI stock firmware. You see the original Reddit post for full details of all the changes.
- If starting from scratch, download the tg3040_Brick_SD_base_package_20241105.zipand extract it to the root directory of a freshly FAT32 formatted micro SD (see above for instructions)
- Sit back and relax because this will take 10-15 mins

Just extract the zips to the base of the SD card - If you already have a stock card, or have done the above step with a fresh one, download the StockMix20241203.zip and extract the contents of that zip to the base of the SD card. Overwrite all previously existing files.

- Drag and drop any Roms and Bios files to their respective directories, and then reinsert the SD into the Brick. Get gaming!
Did You Forget About CrossMix?

We’re glad that you asked! And the answer is no, we haven’t forgotten about CrossMix-OS for the TrimUI Brick. At the time of this writing, CrossMix is not currently available for the Brick, as it’s still being actively developed. However, we’re expecting this new custom firmware option to be released in the near future. When that happens, we’ll be sure to update this guide with the pertinent and necessary steps to get it set up on the Brick.
NextUI

This recent MinUI fork promises improvements with latency and efficiency over the base MinUI package. Thankfully, the install process is just as simple as it is on the standard version of MinUI.
- Download the latest stable NextUI release from the project GitHub.
- Format a fresh SD card to FAT32 using Rufus or the program of your choice
- Open the MinUI-base package to view the files and directories within
- Extract the MinUI.zip file, the directory appropriate for your device (in this case TrimUI) along with the Bios, Roms, and Saves folders (these aren’t even entirely neccessary, but they aren’t hurting anything).
- Pre-load any ROM or Bios files from your library to the card. Place games in their respective system directories. Bios files can be loose dumped in the Bios directory.
- Remove the SD card from your PC.
- Insert into the Brick and power-on. You should see the MinUI or NextUI logo before booting into the main menu.
- Enjoy!

Conclusion
The TrimUI Brick is still very much the new kid on the block at the time of writing. It helps that it shares many of the same internals as its horizontal cousin, the TrimUI Smart Pro, but it will still take time for devices to get out into the hands of community developers.
There will be bugs to iron out prior to seeing full-fledged releases on the device. As things progress and more CFW is officially supported, we will continue to add to and update this guide as appropriate.
[button link=”https://rh-go.link/TrimUI-Brick_AE” color=”red” newwindow=”yes”] TrimUI Brick at AliExpress[/button]
What did you think of this article? Let us know in the comments below, and chat with us in our Discord!
This page may contain affiliate links, by purchasing something through a link, Retro Handhelds may earn a small commission on the sale at no additional cost to you.


3 Comments
StockMix20241203.zip download link doesnt work
StockMix:
“3. If you already have a stock card, or have done the above step with a fresh one, download the StockMix20241203.zip and extract the contents of that zip to the base of the SD card. Overwrite all previously existing files.”
Well thank you sir, I just lost all my roms and bios that came with my trimui.
Am expecting my brick soon and planning o Stockmix. Good to know this will happen.Will take backup before. Thanks for your comment.