The R36S is a clone console that you’ve likely purchased for its capabilities and extremely budget-friendly pricing. Here, we hope to help you navigate the various CFW options available for the system.
Table of Contents
- Preparation
- Backing Up Original Firmware
- Flashing Custom Firmware
- Custom Firmware for R36S
- Setting Up ROMs and BIOS
- General Tips
- Conclusion
Please note that this guide will not be applicable to the K36 or its clones masking as the R36S. If you need more information or have concerns about which hardware you have, you can learn more at the excellent R36S Wiki Page.
All information contained herein is for educational purposes only, and the end user assumes all responsibility for any damage to their systems.
1. Preparation
- Required Tools and Materials
- R36S console
- PC
- MicroSD cards (recommended: 16GB for CFW, 128GB for ROMs) Ditch the famous unbranded 36 cards.

Stock R36S SD cards Unload these ASAP They will die - MicroSD card reader
- Software of your choice: Balena Etcher, Rufus, 7-Zip, MiniTool Partition Wizard
- Optional: Linux PC or Ubuntu Live disk. The Disks Utility for GNOME makes life much easier when arranging Linux file structures or completing tasks like resizing a partition.
- Downloads
- Custom firmware of your choosing, e.g. ArkOS
- DTB files specific to R36S
- Your ROMs and BIOS collection
- What Screen Version Did I Get?
- To determine which hardware version of the 36S you’ve received, follow this simple tool on the R36 Wiki – Which Screen Do I Have? Please note that this is now an important step, as it may determine which CFW image you need.
2. Backing Up Original Firmware
This can be an important step in the process. If something goes wrong along the way of the flashing process, you might want to have a full copy of the stock image on hand just in case, and you can always roll back if you want to.
Some software requires you to clone the SD image to another whole disk, but for our purposes, we want to back things up to a file for storage.
Using Win32DiskImager
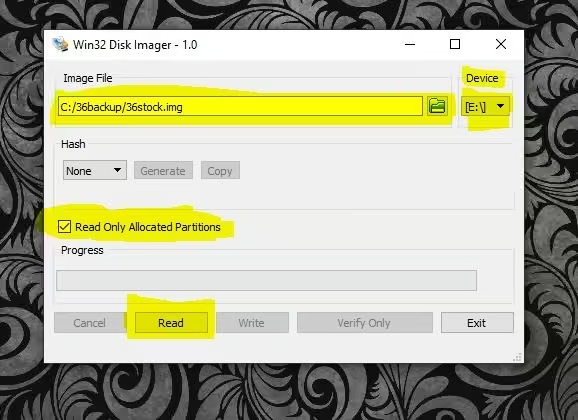
- Fire up Win32DiskImager: Click on the little folder icon under the “Image File” section and choose where you want to save the image output, remembering to add a .img file extension to your chosen filename.
- Choose the image: Choose the device drive you want to clone. *Be very careful during this process, or you can inadvertently erase entire drives you didn’t intend to.

Choosing a place to put your new disk image - Read Only: Ensure that the box “Read Only Allocated Partitions” is highlighted, otherwise you will copy over any blank sectors of the drive along with the data.
- Create the Image: Click on the “Read” button and the software will begin creating the backup image file to the location you chose.

3. Flashing Custom Firmware
As mentioned above, one of the first things you’re going to want to do before flashing custom firmware is to get yourself a decent brand-name SD card(s). The cards that come included with the console are garbage. It’s not really a matter of if they will get corrupted and fail, but when.
Single or Dual Card Setup? – So, the R36S has two micro SD card slots. It is your choice whether you want to have everything just on one card or separate the OS and firmware from the games. The advantage is that a two-card solution provides the flexibility to swap the OS card as you see fit.
If you’re having a difficult time deciding between the available options, I’d recommend checking out examples of each running on the device on YouTube and deciding what you think will apply best to your specific wants and style. If you’re still in doubt, ArkOS is probably the safest bet, as it will have the most community support for these devices.
Flash Custom Firmware Using Balena Etcher
The process for all of these CFWs is very similar, but not necessarily the same, so please take note when installing.
- After launching the program, choose the “Flash From File” option and then navigate to the downloaded .img file of your choosing.

Choose your image - Click the “Select Target” button in the center of the window and then choose your blank SD card from the list of devices. Be SURE you are clicking on the correct drive, or you could delete the entire contents of another drive unintentionally.

Flash your SD card not your computers hard drive - Allow the .img file to write and verify in Balena Etcher and you’re done!*Note – If you have issues with ArkOS and Balena Etcher failing verification, it will likely still work, but you can try your luck with any other image writing software such as Rufus or………….

Flashing
Flash Custom Firmware Using Win32DiskImager

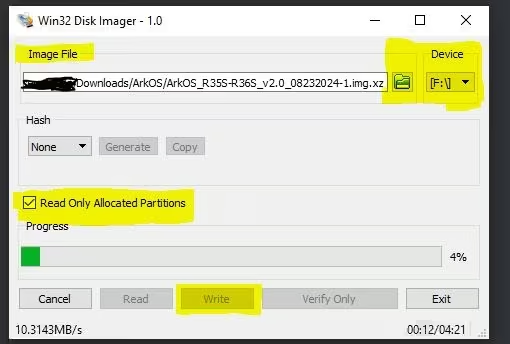
- Fire up Win32DiskImager: Click on the little folder icon under the “Image File” section and select the downloaded CFW of your choice.
- Choose the destination: Select the destination device for the image file. Double-check and make sure you are writing to the correct place
- Write the image
Flash Custom Firmware Using Raspberry Pi Imager
- Launch Raspberry Pi Imager: Click on “Choose OS” and select “Use Custom”

Select use custom - Choose Storage: Select the SD card and NOT your PC hard drive!
- Write the image

Pi Imager Not just for pi anymore 
Written image is ready for insertion
The Screens
As these devices have had numerous minor hardware revisions and interations, releases are no longer one-size-fits-all. There different screen panels used in different versions of the device, and you will need to determine which is yours before installing custom firmware. If you already know which panel your device is sporting, then move right ahead. If you’re unsure, you can checkout this brilliant Identifier Tool from Aeolusux.
Custom Firmware Solutions for R36S
ArkOS
This is a fork of ArkOS maintained by the community and for the 36S family of devices. Game Console now ships the device with a recent build usually already installed, but this guide can help start fresh with a new card, as we’d recommend.
Install ArkOS on R36S

- Download the latest version of ArkOS from the releases page.
- Decompress the image using a tool like 7-Zip or WinRAR.
- Write the image to an SD card using an imaging tool such as Raspberry Pi Imager, Win32 Disk Imager, or Balena Etcher.
- If needed, replace the DTB file on the boot partition with the one specific to your R36S.
- Insert the SD card
- Power on the device and follow the on-screen instructions
ROCKNIX
Install ROCKNIX on R36S
- Download the latest version of ROCKNIX from the releases page.
- Unzip the image using the software of your choice such as 7zip or WinRaR.
- Write the image to an SD card using an imaging tool such as Balena Etcher, Raspberry Pi Imager, or Win32 Disk Imager.
- Insert the SD card into your R36S console and power it on.
- Follow the on-screen instructions to complete the initial setup.
AmberELEC
Install AmberELEC on R36S
- Download the AmberELEC image from the AmberELEC GitHub repository.
- Flash the image to an SD card using Balena Etcher or a similar tool.
- Insert the SD card into your R36S console and power it on.
- Complete the initial setup by following the on-screen instructions.
Pan4Elec

Note that Pan4Elec is only intended for the P4v5 version of the R36S. If you have any questions about which version of the device you are using, you can check with the ArkOS Panel Tool.
- Head over to the Pan4Elec Releases section of the GitHub and download the latest image file for the R36S. We want the release for the RG351MP (confusing I know) Eg: PAN4ELEC-RG351MP.aarch64-20250315.img.gz
- Unpack the downloaded .gz package and and extract the .img file to a location of your choice.
- Write the .img file using any of the methods listed in the guide above.
- Remove the SD card from your PC and insert it into the TF1 slot (right side) on the R36S.
- Power on the R36S and you should be greeted with a Pan4Elec logo and text that the image is unpacking and installing on the system.
- Reinsert the SD card into your PC and place your ROM/BIOS collections in the appropriate directories that have been unpacked by the system onto the card.
4. Setting Up ROMs and BIOS
- If you’re using a two-card setup, format the second card to FAT32 or exFAT (depending on drive size)
- Connect the handheld to your PC via USB, or remove the SD card to be used for ROMs and insert it into your PC card reader.
- Drag and drop your ROMs over to the corresponding directories on the SD card via your PC. NOTE: USA users may be thrown off by the ROM system directory names at first. Please note that all systems are labeled with their original names. So NES will be FC for Famicom, Genesis with be MD for Megadrive, etc.
- Reinsert the SD card into the device and refresh the game lists.
General Tips
- DO NOT power off the device by holding down the power button. Think of this as a PC that needs to be shut down properly now. Press START and navigate to QUIT —-> Shutdown
- You can swap button layout styles to your preferred Nintendo (default) or Xbox layout. Press START and navigate to Advanced Settings —-> Switch A/B
- Themes can be changed locally by pressing START and navigating to UI Settings —-> Themes
- A single tap of the device power button will now send it into standby mode.
Conclusion
So this guide should get you to a good jumping-off point, but if you’re still new to the space, I’d encourage you to continue exploring. The community is regularly updating and improving offerings, and it’s always fun to tinker and find what will work best for you. From here you can start to explore patches, tweaks, ports, and a whole host of other options for this wonderfully adaptable handheld.
[button link=”https://rh-go.link/R36S_AE” color=”red” newwindow=”yes”] R36S at AliExpress[/button]
What did you think of this article? Let us know in the comments below, and chat with us in our Discord!
This page may contain affiliate links, by purchasing something through a link, Retro Handhelds may earn a small commission on the sale at no additional cost to you.


4 Comments
What happens when you hold down the power button? You said dont turn it off this way.
I’ve tried a couple of times to save my game on Pokémon sapphire on the game it advance catagory.
I’ve tried the select + L1 method when I go back onto the game but it doesn’t seem to work?
Are there any suggestions? Do I need another SD card in order to save future games?
I don’t want to have to keep restarting the game all over again.
Thank you in advance.
Does anybody have a problem with a blinking red light?
This more than likely means you have a clone and not a original R36S. Clones can work just fine, but you’ll need to find a custom ArkOS for clones, not the actual thing.