When you’re the sort of retro gamer who uses Batocera as the preferred Retro Handheld operating system of choice, every year begins with the traditional silent prayer of the underdog: “Maybe this year will be our year”
For Batocera though, there’s actually a chance that 2024 will be its year. It could be down to everyone’s favorite YouTuber — RetroGameCorps — choosing Knulli (a fork of Batocera) as his favorite custom operating system for the 35XX Plus — some of his favorite devices of 2024 – or maybe it’s down to everyone’s other favorite YouTuber – our very own Zu – who recently used Batocera to build his own games console. Even now, at the time of writing, TechDweeb has just this minute released a video where he described Knulli as making the 35XX series “amazing”.
The predictability of Batocera’s releases drew me in. Batocera models itself more after traditional Linux distributions, and so maintains a predictable release cycle – usually releases per year – and keeps support for all handhelds where possible (for example, to my knowledge, it’s the only operating system to still provide updates for my beloved RGB10).
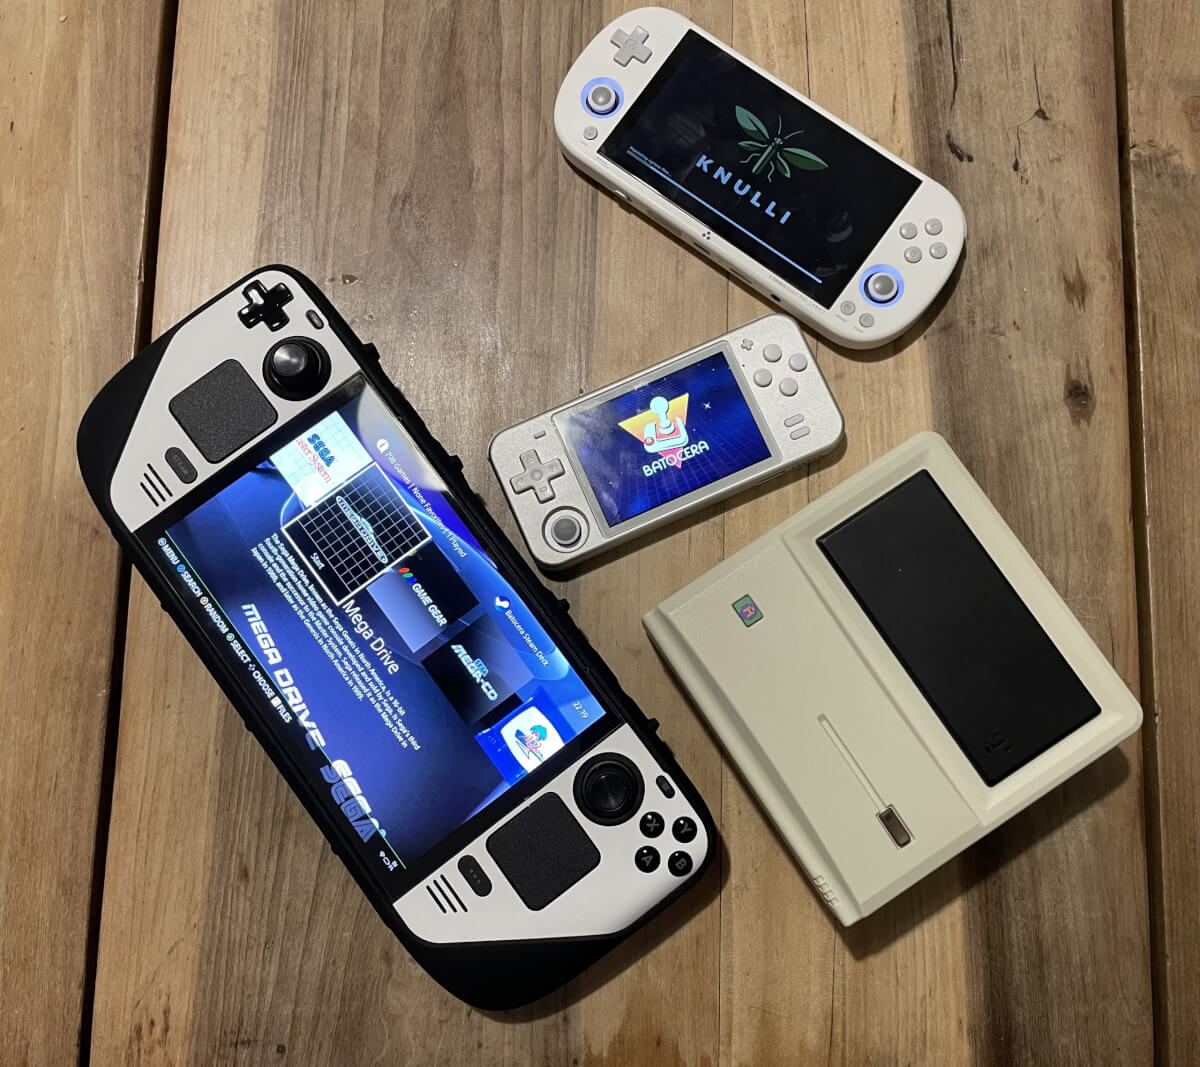
What I don’t love about Batocera is related to the fact that it steadfastly maintains its own hotkey alignment, rather than following the defacto standard used across all other RH Linux operating systems. RetroGameCorps even makes mention of this during his recommendation of Batocera for the 35XX series.
This article provides a solution, enabling gamers to reconfigure Batocera hotkeys to match their preferences. It should apply to both Batocera and Knulli as well as any other Batocera forks
Other Linux Operating Systems and the Defacto Hotkey Standard: A Brief History
Like many in the scene, my first experience of EmulationStation came using 351ELEC on the RG351P. In those days the two main Linux custom OS offerings were 351ELEC and ArkOS, both of which used similar hotkey layouts for things like changing save states, and accessing the RetroArch menu. 351ELEC became AmberElec, which forked into JelOS which in turn forked into ROCKNIX, with the hotkey alignment remaining constant. Later after the launch of our lord and savior — the Steam Deck — EmuDeck was launched, using the same hotkey alignment as 351ELEC. It creates, to my mind, a de-facto standard that we’ll follow to the best of our abilities.
The Limitations
Much like in JelOS, AmberElec, and others, universally defined hotkey shortcuts only work in systems that are emulated through RetroArch. So consoles that rely on stand-alone emulators, like Dolphin for GameCube and PPSSPP for PSP, are affected by these reconfigurations.
Also, just to make our lives easier, we’re not going to assign shortcuts to any analog buttons, so we’ll be using the joypad, start, select, the four face buttons, L1 and R1 only. JelOS shortcuts map rewind and fast forward to L2 and R2, and as a substitute we’ll map them to joypad left and joypad right.
The Text Files
In order to complete the hotkey amendments, we’re going to have to access two text files held on the Share partition of the Batocera installation. Typically, this is an ext4 partition, making the SD card inaccessible on a Windows device without additional software. However, since Batocera users will have likely already accessed this in order to transfer ROMs. My personal preference is to use the desktop mode of my Steam Deck. If a Steam Deck is not available, the instructions to connect over the network from the Batocera Wiki can be found here
The two files we will need access to are retroarchcustom.cfg which is located at the following location: Share -> System -> Config -> Retroarch -> retroarchcustom.cfg and batocera.conf which is located at Share- > System -> batocera.conf
I strongly suggest you make backups of both files prior to opening them, in case anything goes wrong.
Why two files?
This comes down to the way Batocera works. RetroArch configurations are held in retroarchcustom.cfg, however, Batocera centralizes the management of universal settings through the EmulationStation frontend (essentially the settings which are edited through the start menu on EmulationStation) and saved them in batocera.conf. Any changes we made to retroarchcustom.cfg would be overwritten by the current Batocera settings during bootup. However, the way buttons are mapped in Batocera is unique to the different builds (e.g. the x86 build has different mappings to the Steam Deck or RG552 builds, and all Knulli builds will have their own button mapping), so the button numbers need to be copied from an existing source of information, such as retroarchcustom.cfg.
Please see the two images below as an example. The left image is retroarchcustom.cfg taken from a TrimUI Smart Pro running Knulli and the right image is retroarchcustom.cfg on a Steam Deck running Batocera. We can see that codes for inputs such as input_player1_a_btn (i.e. the A button – or X button on a PS controller) are totally different.
Getting the Button Mapping Information
As we mentioned, the button mappings are in the file Share -> System -> Config -> Retroarch -> retroarchcustom.cfg
Rather than open this on an SD card or network share, I recommend saving a copy on the PC you’ll be using to edit the text files.
Opening this file will give a long list of text which should start “menu_driver = ozone”
The information we need is near the bottom – we are looking for a list of text that starts “input_player1” – the first line should be “input_player1_a_btn”
We need to make a note of the numbers/codes for the 4 joypad directions, A, B, X, Y, Start, Select, L, and R – where L and R are L1 and R1 respectively. Anything which starts “input_player1_gun” can be ignored.
The Button Mapping follows the Nintendo layout, so you’ll need to mentally translate: the A button here corresponds to the Circle button on a PS controller and the B button on an Xbox controller.
Using the output from the TrimUI Smart Pro as an example, I’ve bolded out the outputs we need to pay attention to. Be aware that, depending on the device, the output for the joypad buttons may be a joypad direction, such as the example below, or a pure number, such as 12 – this is what the Steam Deck output is.
input_player1_a_btn = 1
input_player1_b_btn = 0
input_player1_x_btn = 3
input_player1_y_btn = 2
input_player1_l_btn = 4
input_player1_r_btn = 5
input_player1_l2_axis = +2
input_player1_r2_axis = +5
input_player1_start_btn = 7
input_player1_select_btn = 6
input_player1_gun_aux_a_btn = 1
input_player1_gun_aux_b_btn = 0
input_player1_gun_aux_c_btn = 2
input_player1_gun_offscreen_shot_btn = 4
input_player1_gun_trigger_btn = 5
input_player1_gun_start_btn = 7
input_player1_gun_select_btn = 6
input_player1_up_btn = h0up
input_player1_gun_dpad_up_btn = h0up
input_player1_down_btn = h0down
input_player1_gun_dpad_down_btn = h0down
input_player1_left_btn = h0left
input_player1_gun_dpad_left_btn = h0left
input_player1_right_btn = h0right
input_player1_gun_dpad_right_btn = h0right
Adding Text to the Config File
Once this information is copied down (I copy it to a text file, some really retro people may use a pen and paper instead), we’re finished with retroarchcustom.cfg.
We need to now turn our attention to Share- > System -> batocera.conf
As I mentioned before, I strongly recommend making a backup of these files before anything else, which can be restored if something goes wrong. I also again recommend working on a locally saved copy on your PC, which can then be saved to the Batocera handheld once editing is complete. Some PCs will ask which application to use to open the file, and this should always be a pure text editor like TextPad on Windows or TextEdit on Mac.
When you open batocera.conf, it should look something like this. At the bottom of the text file will be a list of user-defined configurations such as the wifi network name and password (stored in plain text, try not to think about that too much), and we are looking to add text to the bottom of this section.
Customize For Your Device
I’ve typed out the generic configuration text which needs to be pasted to the bottom of batocera.conf. To make it work on your device, edit the text below to add the specific button codes for your device. As holding text, I’ve put the button name inside square brackets (e.g. [ ]) – replace this with the number or joypad direction code.
For example, using the TrimUI Smart Pro configuration information in the section above as an example, the text “global.retroarch.input_fps_toggle_btn=[Y button]” would be replaced with “global.retroarch.input_fps_toggle_btn=2”
This is the text to edit and then paste into the config file:
global.retroarch.input_ai_service_btn=nul
global.retroarch.input_screenshot_btn=nul
global.retroarch.input_shader_next_btn=nul
global.retroarch.input_shader_prev_btn=nul
global.retroarch.input_disk_eject_toggle_btn=nul
global.retroarch.input_exit_emulator_btn=[Start Button]
global.retroarch.input_menu_toggle_btn=[X Button]
global.retroarch.input_fps_toggle_btn=[Y Button]
global.retroarch.input_pause_toggle_btn=[A Button]
global.retroarch.input_reset_btn=[B Button]
global.retroarch.input_state_slot_increase_btn=[Joypad Up]
global.retroarch.input_state_slot_decrease_btn=[Joypad Down]
global.retroarch.input_save_state_btn=[R Button]
global.retroarch.input_load_state_btn=[L Button]
global.retroarch.input_hold_fast_forward_btn=[Joypad Right]
global.retroarch.input_rewind_btn=[Joypad Left]
After making the changes, save the files and transfer them back to the Batocera SD card. Be aware that sometimes TextPad in Windows will try and rename the file “batocera.conf.txt”. If this happens just rename the file back to batocera.conf.
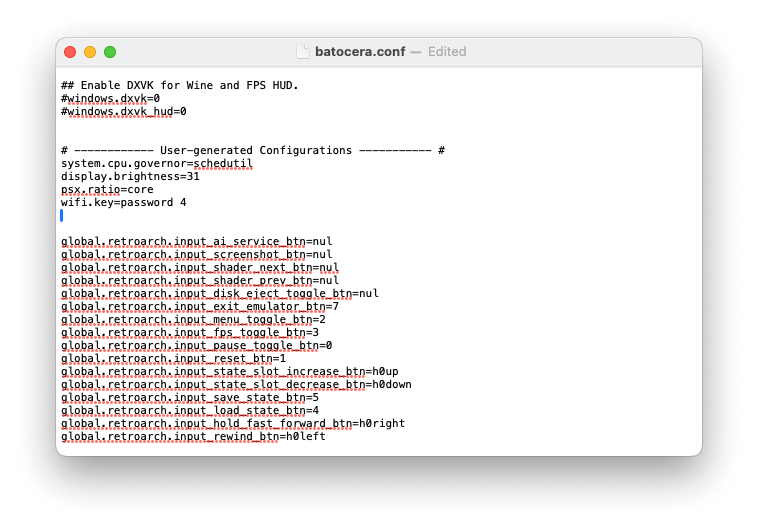
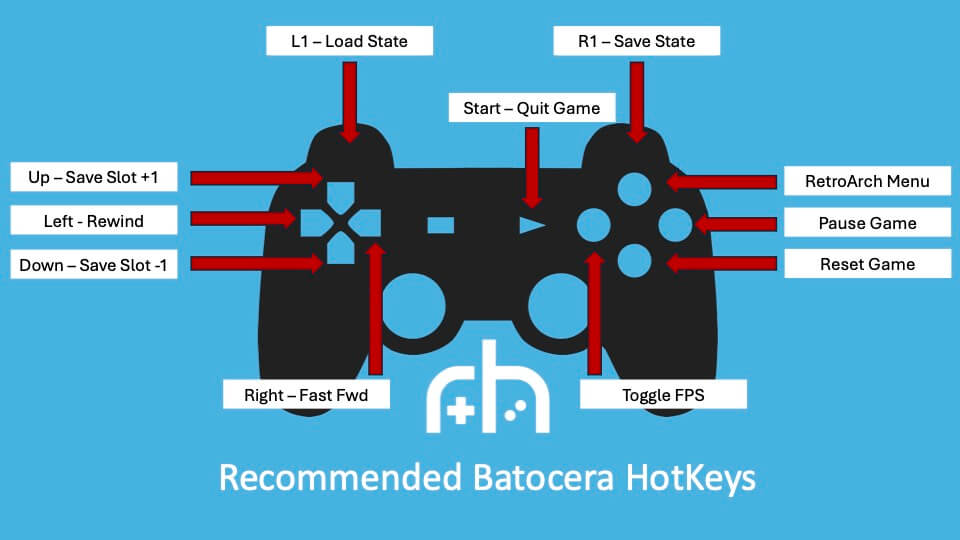
After that, enjoy your gaming. If the new hotkey shortcuts are easy to forget, I’ve added a helpful image below:
Further Reading
As mentioned above, I’m attracted to Batocera because it’s managed more like a standard Linux distro than most Retro Handheld custom OSs. One of the benefits of this is its thorough wiki. I learned to do most of what I’ve shared in this article through the information contained in that wiki, and it’s a great resource for anyone who’s looking to learn more about how Batocera works under the hood, and it can be found here.
Like a number of the scenes, my introduction to Batocera was through RetroGameCorps. However, another YouTuber, Batocera Nation, sparked my interest in adding extra configuration to my Batocera installs. They have a huge number of easy-to-follow guides for adding extra emulators, or PC gaming stores (like the Epic Store) to standard Batocera builds. Their YouTube can be found here.
What did you think of this article? Let us know in the comments below, and chat with us in our Discord!
This page may contain affiliate links, by purchasing something through a link, Retro Handhelds may earn a small commission on the sale at no additional cost to you.



2 Comments
Great artcicle! It always bothered me how you can’t change the hotkeys in Batocera.
One question though – Do you know if it’s possible to save different hotkey configuration per system? I like to have my fastfwd on right trigger in NES/SNES games since they don’t use that button anyway, but would like to keep the standard hotkey + right d-pad for PS1 and anove.
Knulli has addressed this in the current public release. You can remap retroarch hotkeys in the game settings menu and it can be done on a per-system or game-basis in the knulli menus as well.