Greetings friends and fellow enthusiasts! This is Mikhailov from Team Retrogue, where we like retro games and the devices that bring them to us. In this article, we’re diving into the world of Android Handhelds. There are so many great handhelds that run Android as a front end, and even better emulators for these growing chipsets. This guide will work with all of them. This written review is designed to supplement my video tutorial, and you can find that video below.
I am using a Retroid Pocket 4 Pro to complete this setup guide, but any device that runs Android 11+ can utilize this written guide. Follow the table of contents below in order to quickly navigate this guide.
Initial Setup
Most Android Handhelds will have an initial setup screen like you see below.

During this setup process, you will need to connect to Wi-Fi, set your timezone, and sign into your Google Account if prompted. Signing into your Google Account is optional, but necessary if you want to download games from the Play Store.
Some Android devices will ask if you want to preinstall some emulators like the screenshot below.

Although this option is available, I recommend you only download from these sources if you are choosing not to use the Play Store. If you are running on a high powered device like the Retroid Pocket 4 Pro or the Odin 2, you can skip this step entirely.
Finally, you may get the choice to choose from a proprietary launcher or the AOSP launcher. If given that prompt, choose the AOSP launcher. We will be changing that soon anyway.

Daijisho Frontend
Once you’ve made it to the home screen, you can grab the Daijisho front end from the Play Store, or from clicking the link below on your Android device. If installing from the Git Hub page, you will have to authorize Android to install apps from Google Chrome.
https://github.com/TapiocaFox/Daijishou/releases
It is heavily advised to use the Play Store version, but the Git Hub is available if that is not an option,
Head to the Android Settings App. Go to Apps -> Default Apps and set the home app to Daijisho. Now whenever you press the Home button or gesture to go back to the home screen, Daijisho will be the default frontend.
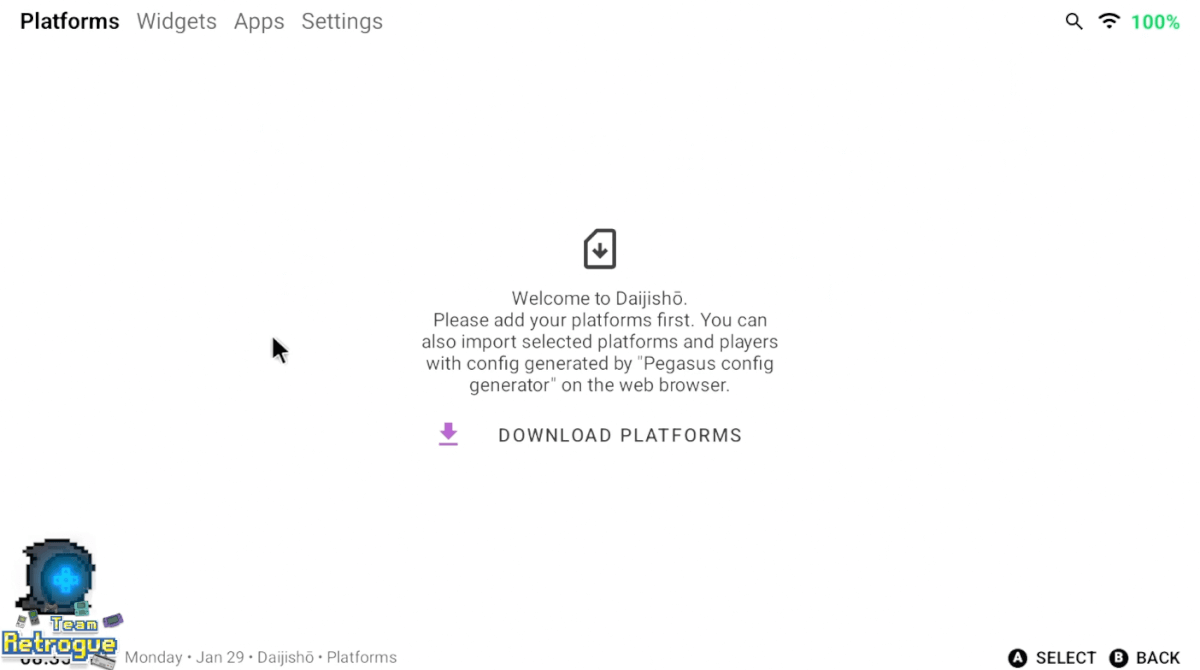
The Daijisho fronend will look like this when initially booted.
If you click the “download platforms” option, you will be able to set up the systems you plan to emulate. They will populate the front end and artwork will be downloaded.
If you go into Daijisho Settings –> Navigation, you can change the Tabs Hotkeys and the Platform Hotkeys. I suggest setting the platforms to L1 and R1 and tabs to L2 and R2. The tabs hotkeys might not work depending on the handheld, but we will make an adjustment later to account for that.
You can also go into Settings –> Appearance, and download artwork packs for the system pages. I recommend the Vivid Extended. If you go with Vivid Extended, or any artwork that has the system name built into the picture, turn on “Hide Title” in the same Appearance tab.
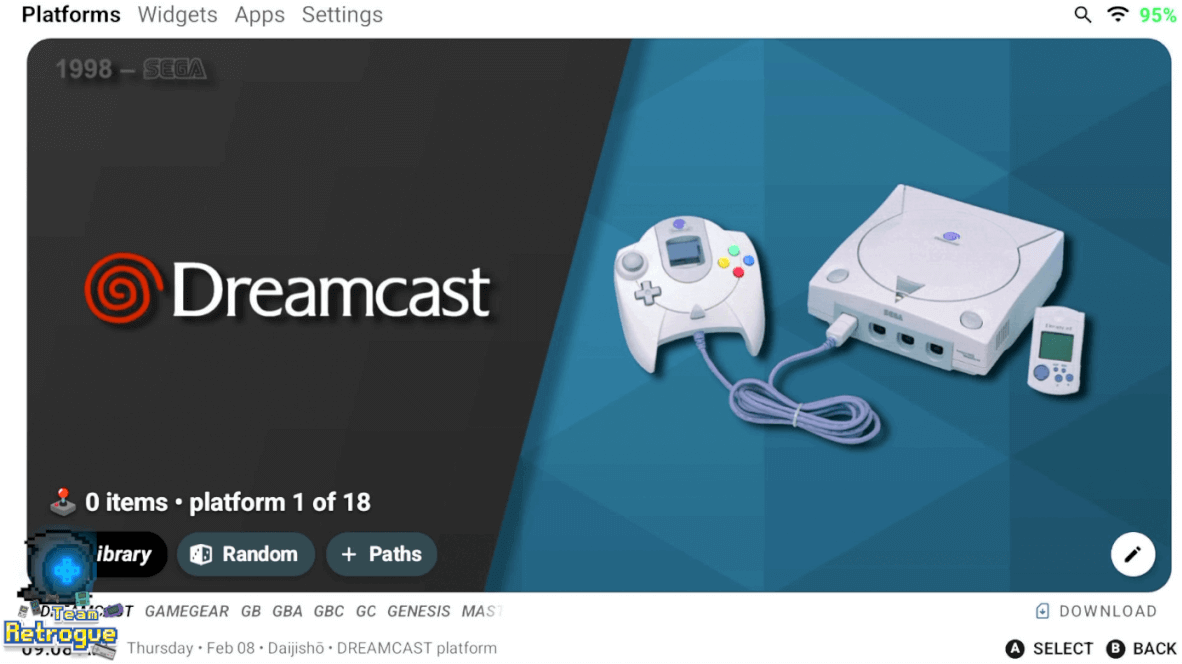
An example of the artwork generated by the Vivid Extended pack with “Hide Title” enabled.
Setting up SD Card
Your best bet to setting up your Micro SD Card would be to have another computer handy, as well as a USB SD Card reader so you can move your files directly to the card. When formatting the card, you can use ExFat for best compatibility. You want to make three folders on the SD Card:
- ROMS
- BIOS
- UPDATES
The ROMS folder should have subfolders for each system to keep things organized. Bios files go in the BIOS subfolder, and if you plan on emulating Nintendo Switch through Yuzu, DLC and Update NSP files should go in the UPDATES folder.
Once you have your ROMs, BIOS files, and updates all set, place the SD card into your device. You will be given a notification saying “Tap to Set Up.” Click that notification, and choose to use the drive for portable storage. This will give you the best option if you want to change or add roms to the SD Card in the future, and you will be able to eject the SD card without complicating the handheld.
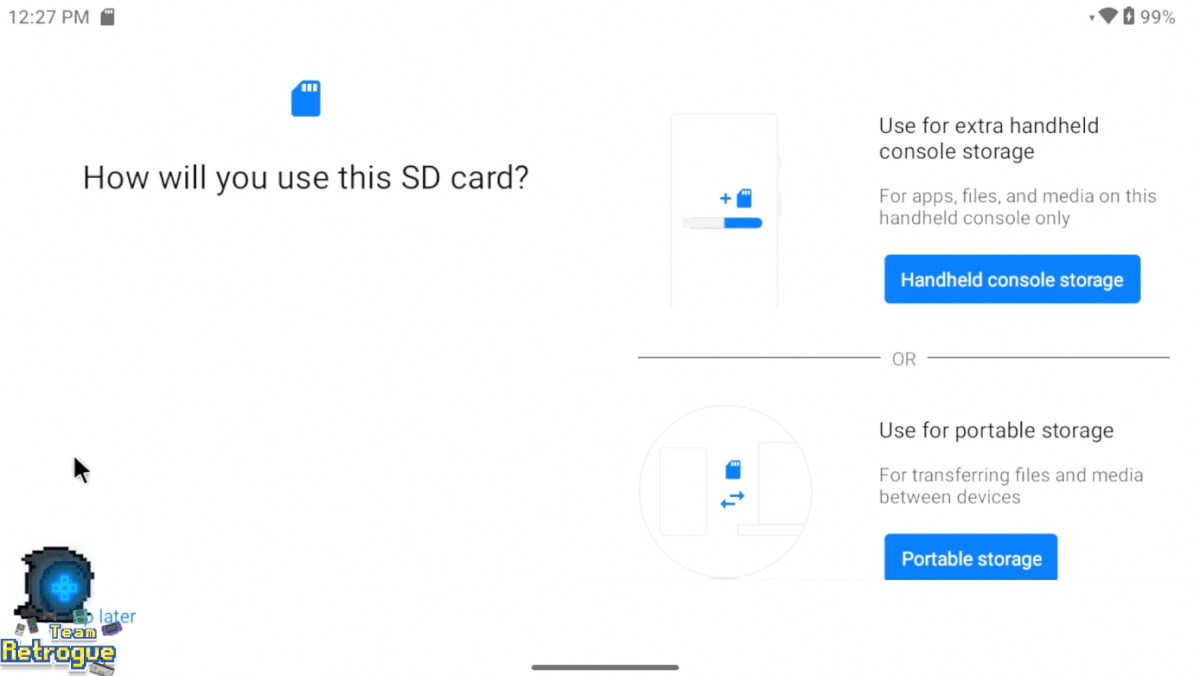
Choose portable storage for best compatibility.
Adding ROM Shortcuts to Daijisho
Head back home to Daijisho and go into one of the platforms. In this example, I will use Dreamcast. Click. “Paths” and direct the frontend to where your ROMs for that system are located on your SD card. You should see the path show up similarly to the screenshot below. Simply click “Sync” to add your ROMs to the frontend.
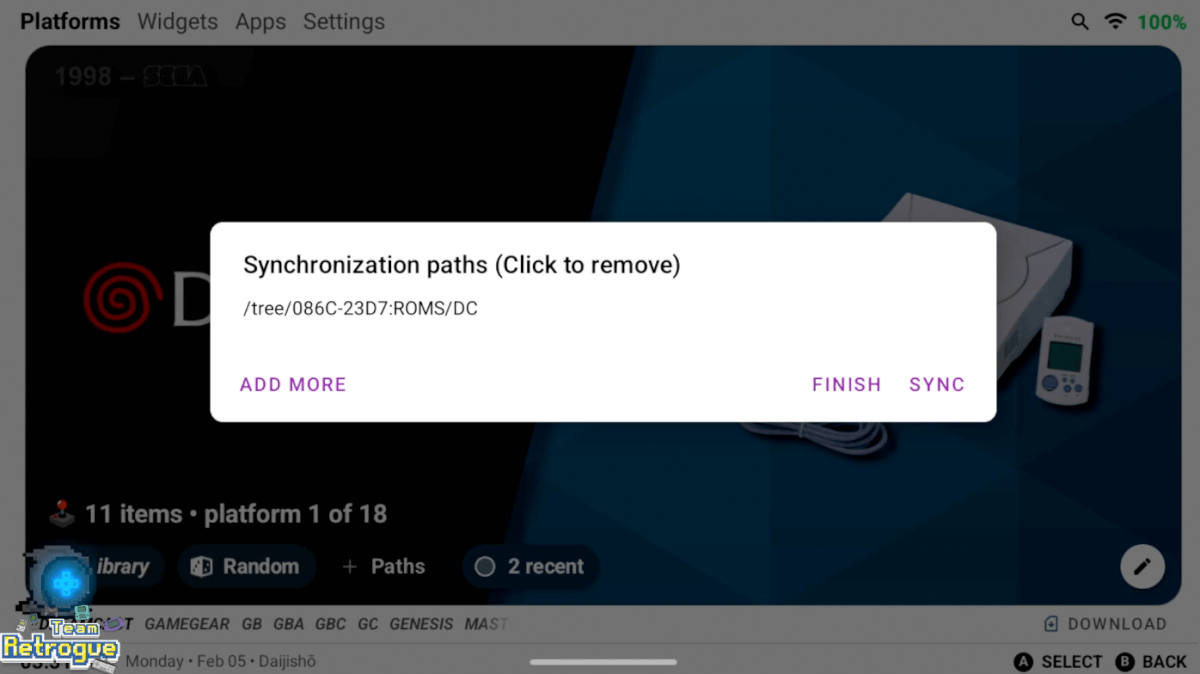
You will need to manually add paths for each system you want to emulate. This can get a bit tedious if you have a lot of systems.
Daijisho will automatically add shortcuts to the ROMs and scrape box art. There are default emulators set for each system, which we can change if we need to. We will do this a bit later in the guide.
Obtainium and Odin Tools
If you are using an Odin 2 or a Retroid Pocket 4, you will want to use Odin Tools to set up some additional shortcuts on your device. The best way to put Odin Tools on your phone is to use another third-party app called Obtainium. You can download Obtainium from the link below. Be sure to download the version: “app-arm64-v8a-release.apk”.
https://github.com/ImranR98/Obtainium/releases
You may receive a prompt to allow Chrome (or your browser of choice) permission to install apps. If so, accept this prompt and turn on the button to give Chrome permission. You will then be asked if you want to install Obtainium. Click “Install.”


Now that Obtainium is installed, we’re going to use a custom script called “Obtainium-Export.json” in order to install several different emulators, as well as Odin Tools. Using Chrome, or any Internet Browser on your device, navigate to this link:
https://gist.github.com/RJNY/e65f453ec707661ea13504beef7e86e2
Right click or long press the “Raw” button, and download the link. Then use Obtainium to import the script by clicking “Import/Export” then “Obtainium Import.” Navigate to your downloads folder and import the json. You may have to give permission to install unknown apps from Obtainium similarily to when you did with Chrome earlier. Now you can navigate to each app and install it. This will install nightly versions of multiple emulators, including RetroArch.


Odin Tools will do a few things for you. It will provide shortcuts in your quick settings menu to change your face button setup, and it will also allow you to set your L2 and R2 buttons to “Analog”, “Trigger”, or “Both”. Set it to both in order to use your L2 and R2 buttons properly in Daijisho.
Play Store Apps
Obtainium covered some of our needs, but we will need the Play Store for additional emulators. Below are additional apps I recommend you download from the Play Store:
- PPSSPP (PSP)
- Redream (Dreamcast)
- Duckstation (Playstation)
- Mupen64 Plus FZ (N64)
- Drastic (NDS)
You can also use the RetroArch cores for these systems if you don’t want to use the Play Store
RetroArch
Now it’s time to configure several different emulators, starting with RetroArch. This emulator will cover the majority of the retro game systems you may want to emulate.
When you first boot up RetroArch, you will need to allow it to access your device. Everything is already turned on, so you just need to click “continue”. RetroArch will look like the screenshot below:

This menu is hard to navigate in my opinion, so tap the gear on the right to go into Settings. Then navigate to Drivers –> Menu, and choose the “ozone” option. Then hit the home button on the right to go back to the main menu. Navigate to Configuration File –> Save Current Configurarion, and exit RetroArch. When you next enter the program, it will look like this:
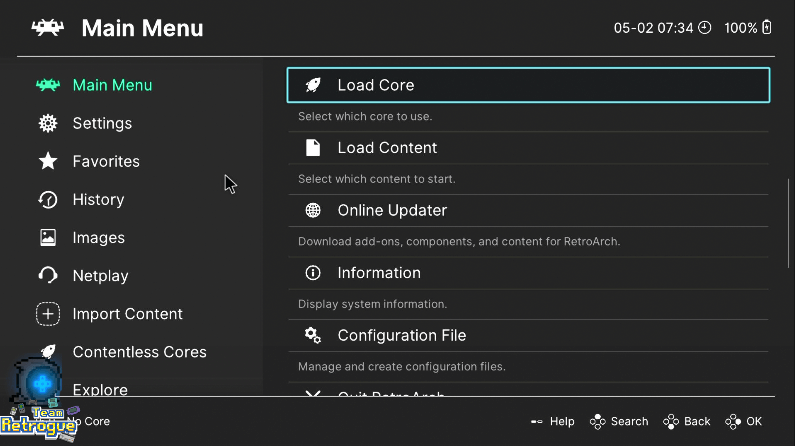
The ozone menu driver is much easier on the eyes, and also easier to navigate with a controller.
Now that we have the menu sorted, let’s go into settings and make some changes:
- Main Menu –> Online Updater –> Core Downloader –> Download all cores you wish to use.
- Main Menu –> Online Updater –> Update Assets, Update Controller Profiles, Update Databases, & Update GLSL Shaders
- Settings –> User Interface –> On-Screen Display –> On-Screen Overlay –> Set “Hide Overlay When Controller is Connected” to ON
- Settings –> Input –> Menu Controls –> Set “Menu Swap OK and Cancel Buttons” to OFF
- Settings –> Directory –> System/BIOS –> Set to /storage/####-####/BIOS (The BIOS folder in your SD Card)
- Settings –> Video –> Video Filter –> Normal4x (Skip this step if using a low-powered device)
- Settings –> Input –> Hotkeys –> Make the following changes:
- Hotkey Enable –> Click L3 on the controller
- Menu Toggle –> Click X on the controller
- Quit –> Click R3 on the controller
- Fast-Forward (Toggle) –> Click R2 on the controller
- Rewind –> Click L2 on the controller
- Load State –> Click L1 on the controller
- Save State –> Click R1 on the controller
- Show FPS –> Click Y on the controller
- Don’t assign any hotkeys to “B” or “A” because that will glitch RetroArch and you will need to uninstall and start over. This is a known issue in the Android version of RetroArch.
- Main Menu –> Configuration File –> Save Current Configuration
Now whenever you want to access one of the above features of RetroArch, you just need to hold down L3, and press the corresponding button. For example, hold L3 and press X to open the RetroArch menu. We have also added a video filter to enhance the picture quality of your games, and eliminated the touchscreen overlay.
This is the basic setup, and you can start to load games from there, but let’s go over some control settings we can adjust for certain systems.
- For systems with two face buttons (NES, GB, GBC, GBA), I like to change the face button layout to better fit thumb placement, similar to an SNES controller by doing the following:
- Load up an NES, GB, or GBC game.
- Hold L3 and Press X to enter the menu.
- In Quick Menu navigate to Controls –> Port 1 Controls and set the following:
- B (Auto), Key z –> A
- A (Auto), Key x –> A
- Y (Auto), Key a –> B
- X (Auto), Key s –> Turbo B
- Go back one menu to Controls, then go into Manage Remap Files.
- Click “Save Content Directory Remap File”.
- For Pokemon Games or RPGs for the above system, use this controller setup:
- Load up an NES, GB, or GBC game.
- Hold L3 and Press X to enter the menu.
- In Quick Menu navigate to Controls –> Port 1 Controls and set the following:
- B (Auto), Key z –> B
- A (Auto), Key x –> A
- Y (Auto), Key a –> Select
- X (Auto), Key s –> Start
- Go back one menu to Controls, then go into Manage Remap Files.
- Click “Save Game Remap File”. You will have to set the controls for each individual RPG or Pokemon game.
Finally, let’s do a couple of tweaks for Super Game Boy Enhanced games. Back in Daijisho, head to the Game Boy section and click the pencil on the far right. Change the default player under “player settings” to “63 – gba-RetroArch 64 – mgba”. This will load your Game Boy games with the mgba core, which has support for full color in games that are “SGB Enhanced”. Save your changes, and load up a game like Donkey Kong, Kirby’s Dream Land 2, or Pokemon Red/Blue. Then let’s enter the RetroArch menu using the hotkey we set up earlier (L3 and X).
- Navigate to Quick Menu –> Core Options –> Video –> Set “Use Super Game Boy Borders (Restart)” to off.
- Quit RetroArch and reload the game.
Now whenever you boot up a Super Game Boy Enhanced game, instead of looking like this:
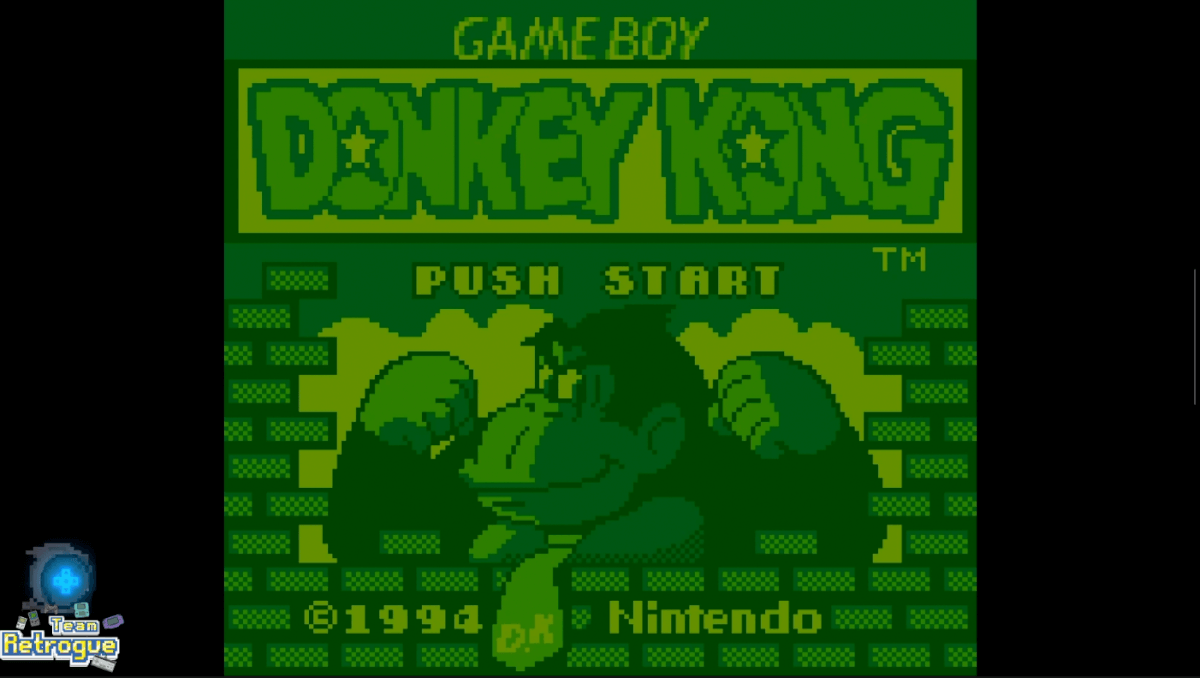
Creamed Spinach!
It will look like this:
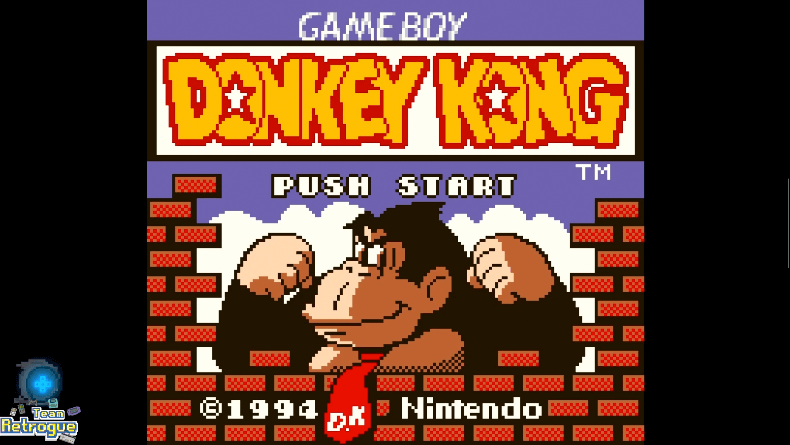
No more creamed spinach.
This is one of my favorite features of emulation, as the only way to play these games in color “back in the day” was to have a Super Game Boy attachment for your Super Nintendo system. Previously limited to CRT TVs, now we can play these games in full color on handhelds.
However, for games that are not SGB Enhanced, there are still two options we can utilize to make them look better.
Option 1 has to be done per-game, and can get tedious, but will get you the best picture.
- In Daijisho, Select a Game Boy game that isn’t SGB Enhanced (Like Dr. Mario).
- On the right, click “Edit Item”.
- Scroll down to “Custom Player Settings” and turn the “Custom Player” switch on.
- In the dropdown menu labeled “Custom player”, select “gb – RetroArch 64 – gambatte.
- Save your changes.
- Do this for each game you want to load with Gambatte. Now boot up one of those games.
- Once the game has loaded, enter the RetroArch menu (L3 + X).
- In the Quick Menu, navigate to “Core Options.”
- Set GB Colorization to “Internal” and Internal Palette to “Special 1” to make your games look like the screenshot below:
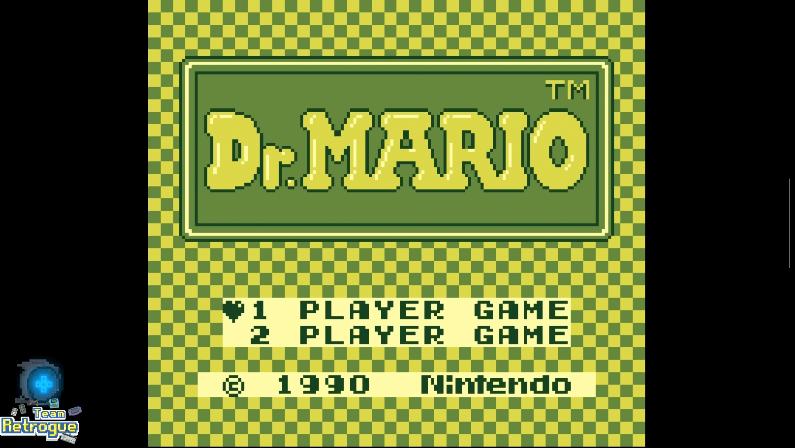
Creamed spinach, but nicer.
If you have a big Game Boy library, and don’t want to set each game individually to Gambatte, you can continue to use the mGBA core, and the game will utilize a grayscale look like this:

You can also make Gambatte the default player for all Game Boy games if you are not interested in Super Game Boy Colors, and the Special 1 colorization will work for every Game Boy game.
Other standalone emulators do not require as much setup, so I will list the steps for each emulator below.
Mupen64 Emulator Setup (N64)
- Allow the Emulator to access Android.
- Click the + button on the bottom right of the main menu.
- Click “Select Folder”.
- Navigate to where your N64 roms are located and click “Use This Folder” then “Allow”.
- Hit “Back” to enter the menu. Navigate to “Settings –> Display”. Set the rendered resolution to 640×480.
- Back in the menu, navigate to “Profiles –> Select Profiles”. Set the emulation profile to “Glide64-Accurate”.
- In this same menu, select “Controller 1 profile –> Manage Profiles”.
- On the top right, press “New” and name it. Click “Ok.”
- You will now have the option to map your controller. Use the diagram below for my recommended mapping.
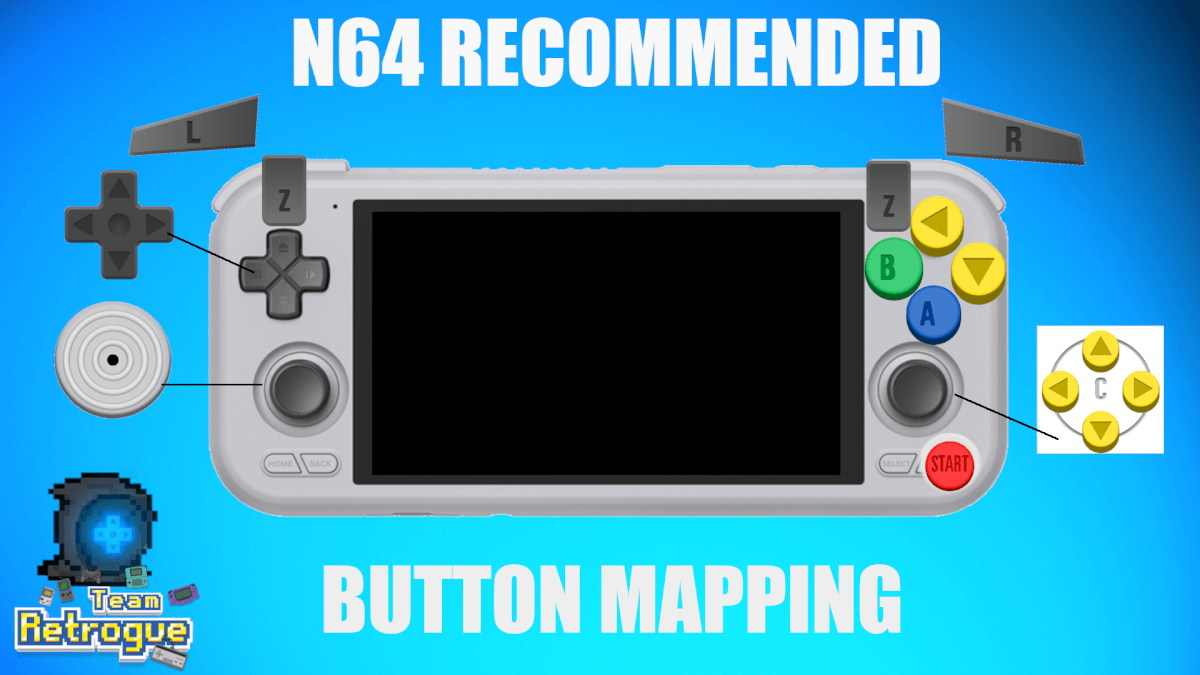
Map Z to L1 and R1 and L/R to L2 and R2.
Redream Emulator Setup (Dreamcast)
- Under “Library”, navigate to the folder where your Dreamcast roms are located.
- Under “Video”, set the game resolution to 1920×1440 (only do this on high end devices while using the paid app version).
Duckstation Emulator Setup (PS1)
- During setup, you may want to set the Resolution Scale to 3x Resolution (720p) or 4x Resolution (1080p) based on the power of your device.
- Continue setup to import your BIOS. You can navigate to the BIOS folder on your SD Card. I used SPCH-5001. Click the BIOS region in order to select your imported BIOS file.
- Once you link the program to your ROM folder, you will be ready for PS1 Emulation.
PPSSPP Emulator Setup (PSP)
- Upon first boot, you will be asked to create a folder for save states and saved games. You cannot put this on an SD card. I put mine in the Documents folder. I simply named the folder “PSP”.
- Click “Browse” to navigate to your PSP rom folder on your SD card.
- If your hardware is powerful enough, you may want to go into settings –> graphics and increase the rendering resolution to 4x PSP for a 1080p picture.
DRASTIC Emulator Setup (NDS)
- Upon first boot, head into the “Change Options” setting. Then go to External Controller.
- Under “Select Key Mapping,” click “Generic Gamepad” then “No Mapping”.
- Click “Map Control” then map the controls accordingly.
- Click “Map Special” then map the following (skip the rest):
- L2 for Screen-Swap
- R2 for Open Menu
- R3 for Pointer Down
- Scroll down slightly in Right Stick Mode. Change the setting to Pointer Mode.
- Now boot up a game, and enter the menu (R2). Click “Menu”.
- Navigate to “Edit Screens and Virtual Pad.” Choose “Landscape 1:1”.
- Click “Resize Screen” in order to edit your screens to your liking. I usually make the second screen smaller than the first.
Dolphin Emulator Setup (GameCube/Wii)
- Click the “+ Add Games” button to add your rom files. You will need to do this for both GameCube and Wii.
- The hardest part about the Dolphin Emulator is setting up controls for both GameCube and Wii.
- Click the settings gear at the top of the application.
- Click “GameCube Input” then click the gear next to “GameCube Controller 1”. Remap the buttons to the recommended configuration below:
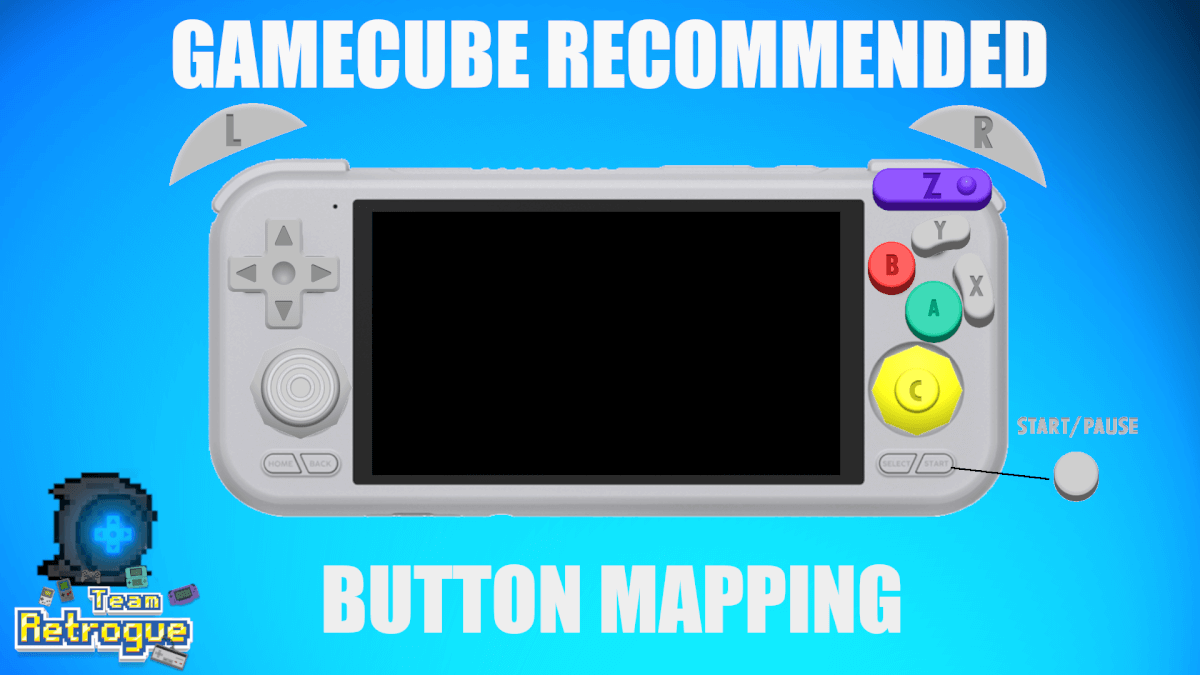
Map L and R to L2 and R2.
- Wii can get very complicated with button mapping depending on the game you are playing. I recommend creating different profiles depending on what the game requires (Pro Controller, Sideways Wii Remote, Etc…), however here is a recommended setting for Wii Remote and Nunchuk.

Citra Emulator Setup (3DS)
- Citra’s setup is pretty straightforward. Go through the initial setup to allow access to files, microphone, camera, and notifications.
- When selecting user folder and games folder, you can set both to be the folder where your roms are located.
- The 3DS had a very similar button mapping to the retro handheld you are most likely using, so you can map the buttons normally. However, map “Cycle Landscape Layouts” to R3. That way, you can adjust your preferred view of the two screens on the fly.
- Under Settings –> Graphics, set the Graphics API to Vulkan. You can also set the internal resolution to 2x, 3x, or 4x depending on the power of your handheld.
Yuzu Emulator Setup (Switch)
- You will need a prod,keys file in order to play Switch ROMs, as well as a Switch Firmware. You will need to consult the Google Lords for this one.
- Once you have those files, go through the setup prompts in Yuzu. It will ask you to locate the prod.keys file as well as your roms directory.
- Once at the main screens, go into Settings –> Manage Yuzu Data. From here, you can install the firmware as well as any update or DLC files you put into the UPDATES folder on your SD Card.
Conclusion
Hopefully this guide helped bring your from zero to hero when setting up your Android device, and now you can enjoy all of the retro handheld goodness that your new Android device brings you. Tune into the TeamRetrogue channel on YouTube if you are interested in seeing more.
Here are the different ways to support Team Retrogue:
Subscribe on YouTube: https://www.youtube.com/c/TeamRetrogue
Support on Patreon: https://www.patreon.com/TeamRetrogue
Until next time: bye for now, and don’t stop belevin’!
What did you think of this article? Let us know in the comments below, and chat with us in our Discord!
This page may contain affiliate links, by purchasing something through a link, Retro Handhelds may earn a small commission on the sale at no additional cost to you.

You wrote to assign both B and A to button A. is this correct?
For systems with two face buttons (NES, GB, GBC, GBA), I like to change the face button layout to better fit thumb placement, similar to an SNES controller by doing the following:
Load up an NES, GB, or GBC game.
Hold L3 and Press X to enter the menu.
In Quick Menu navigate to Controls –> Port 1 Controls and set the following:
B (Auto), Key z –> A
A (Auto), Key x –> A
Y (Auto), Key a –> B
X (Auto), Key s –> Turbo B
I don’t have the option. Goes from 20 to 43 and they’re all just GB
Am I missing something?