
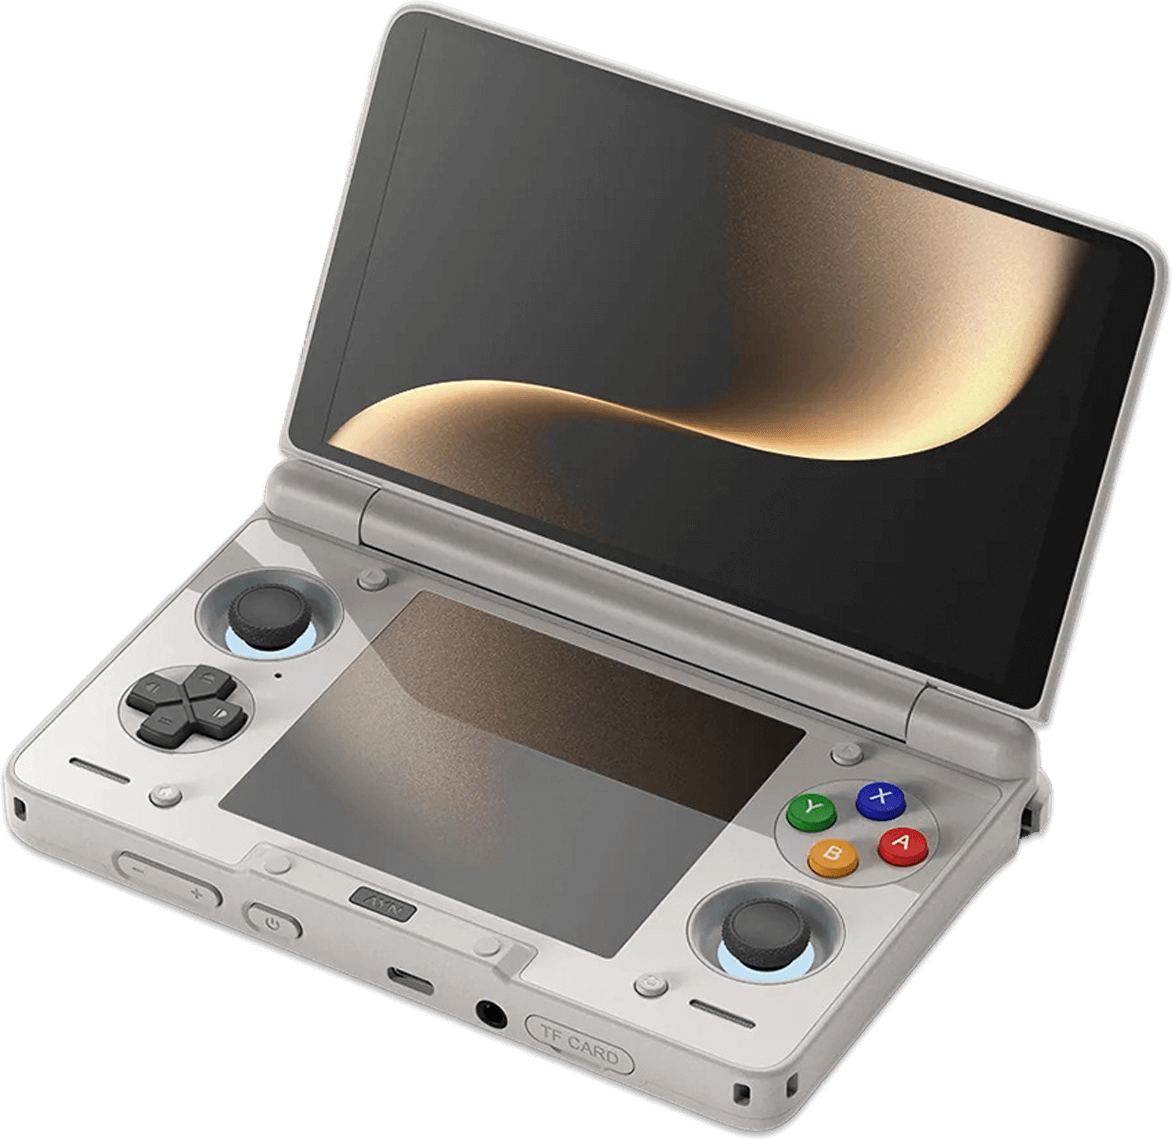
The AYN Thor hit our community like a storm and has arguably become one of the most recognizable and sought-after emulation devices available (or, often, unavailable) on the market. For those who managed to snag one of these OLED beauties, this guide will help you set up your AYN Thor to get the most out of your dual-screen device.
Table of Contents
AYN Thor Specs
The Thor comes in Base, Pro, and Max flavors (all Snapdragon 8 Gen 2, just with different RAM and storage configurations). The full specifications can be found below:
Note: There is a Thor Lite Model with a Snapdragon 865, but there have been some issues with individuals actually getting one, and for $50 more, you can get the much more capable Base model.
| AYN Thor | |
|---|---|
| Display | |
| Size (Top) | 6-inch |
| Screen Type (Top) | AMOLED |
| Resolution (Top) | 1920 x 1080 |
| Refresh Rate (Top) | 120Hz |
| Size (Bottom) | 3.92-inch |
| Screen Type (Bottom) | OLED |
| Resolution (Bottom) | 1240 x 1080 |
| Refresh Rate (Bottom) | 60Hz |
| Hardware | |
| CPU | Qualcomm Snapdragon 8 Gen 2 |
| GPU | Adreno 740 |
| RAM | 8GB | 12GB | 16GB LPDDR5X |
| Storage | |
| Internal | 128GB (UFS 3.1) | 256GB | 1TB UFS 4.0 |
| External | microSD |
| Battery | |
| Size | 6000mAh |
| Connectivity | |
| Wi-Fi | Wi-Fi 7 |
| Bluetooth | Bluetooth 5.3 |
| Ports | USB-C, microSD, 3.5mm Audio Jack |
| Video Out | Yes, via USB-C |
| Physical | |
| Dimensions | 150 x 94 x 25.6mm |
| Weight | 380g |
Recommended Accessories
As far as official accessories go for the AYN Thor, you’ve got a carrying case, soft pouch, TPU shell, TPU grip, lanyard, and screen protectors. These are all available on AYN’s website as an option through an accessories pack, but can also be purchased individually. I find that the TPU Grip makes the device infinitely more comfortable to hold, so definitely spring for that one if you’re interested.

- Accessories Pack
- Thor TPU Grip
- Thor Lanyard
- Thor Carrying Case
- Thor Soft Pouch
- Thor TPU Shell
- Thor Screen Protectors
As far as unofficial goes, you’ve got a set of 3D-printed grips from JCSFY on Etsy that come in “Chonk” or “Comfort” styles.
External Storage
Ah, the age-old question of whether to keep your games and files on the internal storage on the device itself, or the external storage in the form of a microSD card or portable SSD? All my files are kept on a Sharge Disk (external 2230 SSD enclosure), as I find it makes it so that I don’t have to constantly involve my computer in the installation process, and I can even use it to house and play games.
Internal storage is going to be faster and more stable, so plenty of people prefer that option. However, if you’re interested in something like PC emulation through GameNative or GameHub, then you might want to reserve that internal storage for those purposes, as using external storage for PC emulation on Android can cause performance issues and/or crashes.
Installing Apps and Emulators
Now, it’s time to focus on getting your emulators set up. Remember when we had to find and install each emulator and system separately? Retro Handhelds remembers. Those days are long gone, unless you prefer that sort of journey.
Obtainium
Obtainium has made emulation and gaming software installation on Android an extremely simple process, with the help of the Obtainium Emulation Pack. Obtainium will provide links directly to developer sources and pages, cutting out the need to find and manage them yourself. Additionally, Obtainium will also keep tabs on these programs and alert you of any updates that need to be installed.

To install Obtainium and the Obtainium Emulation Pack, follow the steps below:
- Download the latest Obtainium release APK from the browser on your AYN Thor (this saves us having to transfer files back and forth from a PC) and select the base release APK.

- Run the downloaded APK file and follow the prompts to install Obtainium on your Ayn Thor. If you need to enable Developer Mode on an Android, go to “Settings,” then tap “About device.” Find the “Build number” and tap it seven times. Congratulations, you’re now a developer with full device permissions.
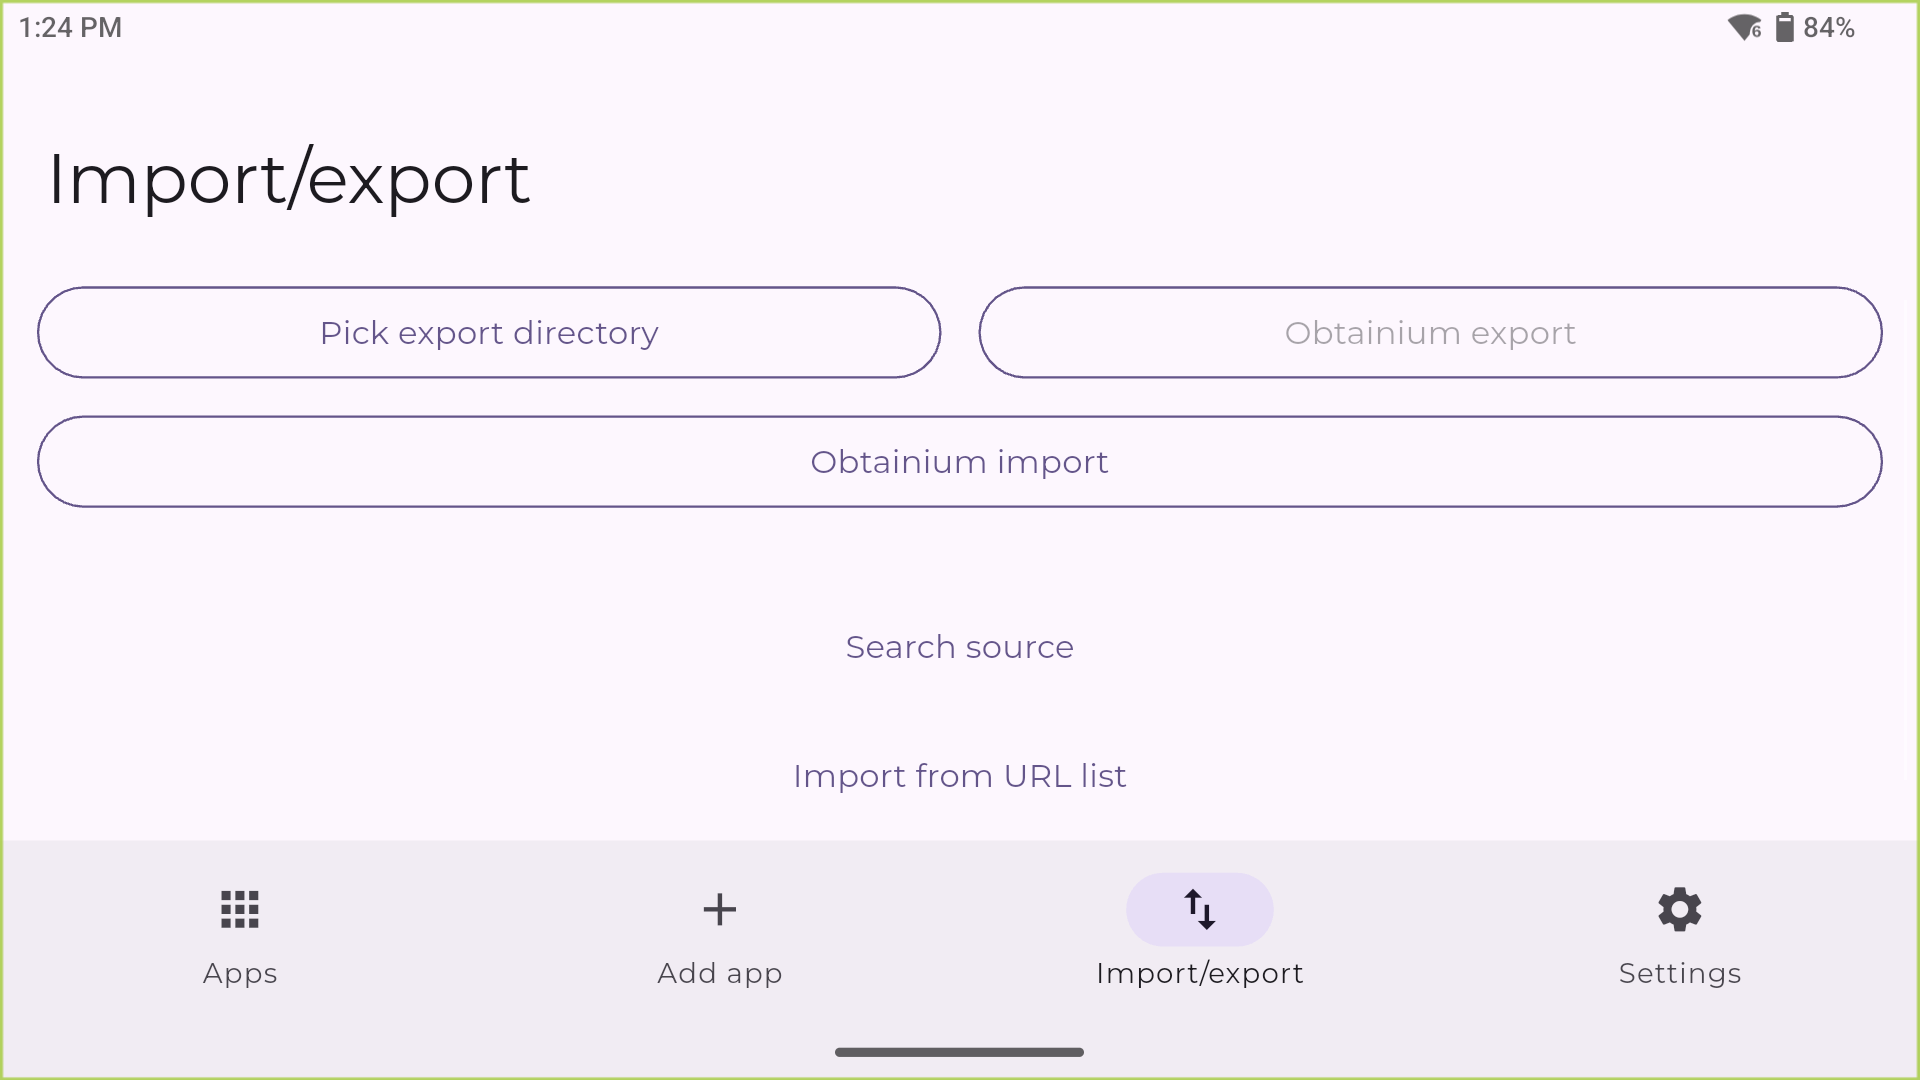
- Now, again in the browser directly on your AYN Thor, grab the latest release of the Obtainium Emulation Pack. Ensure that you are selecting the option that has “dual screen” in the file name. Save the downloaded file in the Downloads directory of your internal storage.

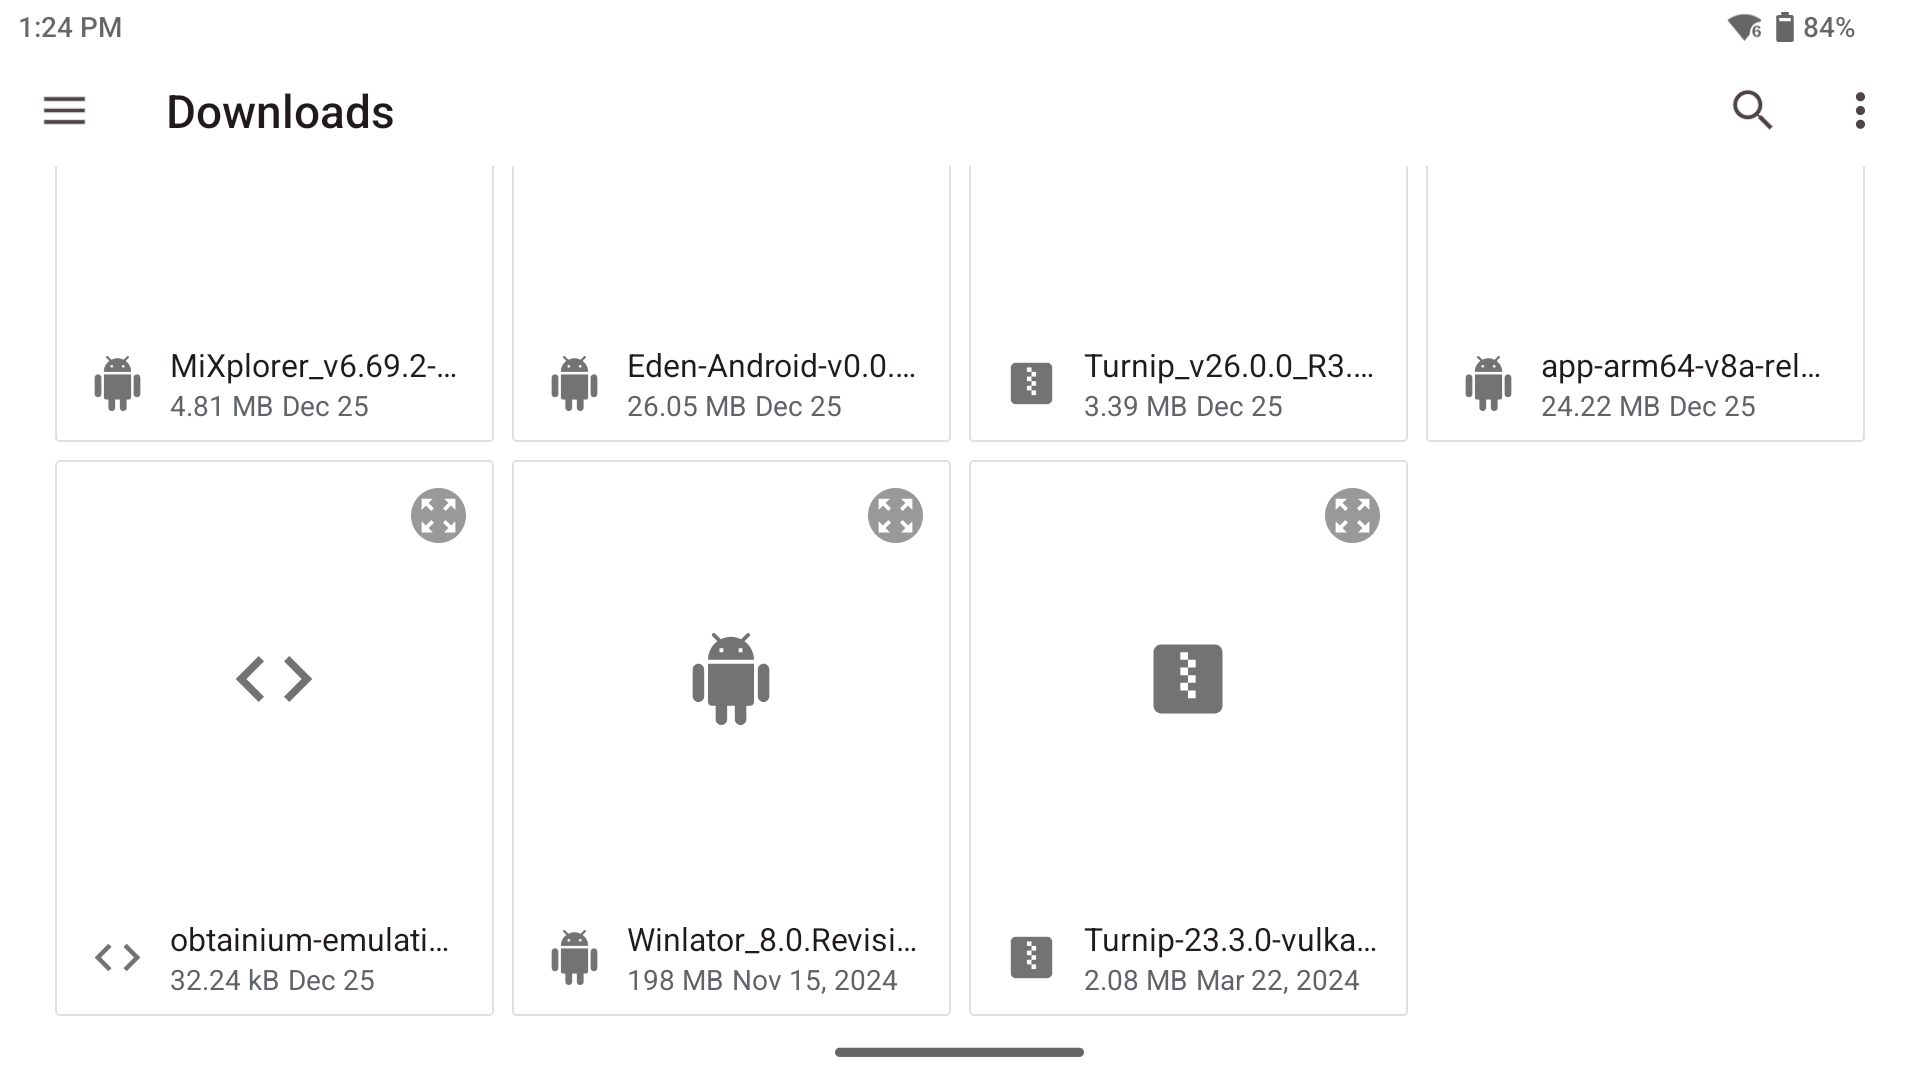
- Navigate back into the Obtainium app, and from the bottom menu of options on the main screen, click on the Import/Export button. Then, hit the Obtainium Import button right there in the center. Click Obtainium Import and choose the downloaded Emulation Pack JSON.

- After clicking Obtainium Import, navigate to the folder where you downloaded the obtainium-emulation-pack.json file. Import the Obtainium Emulation Pack file you downloaded.

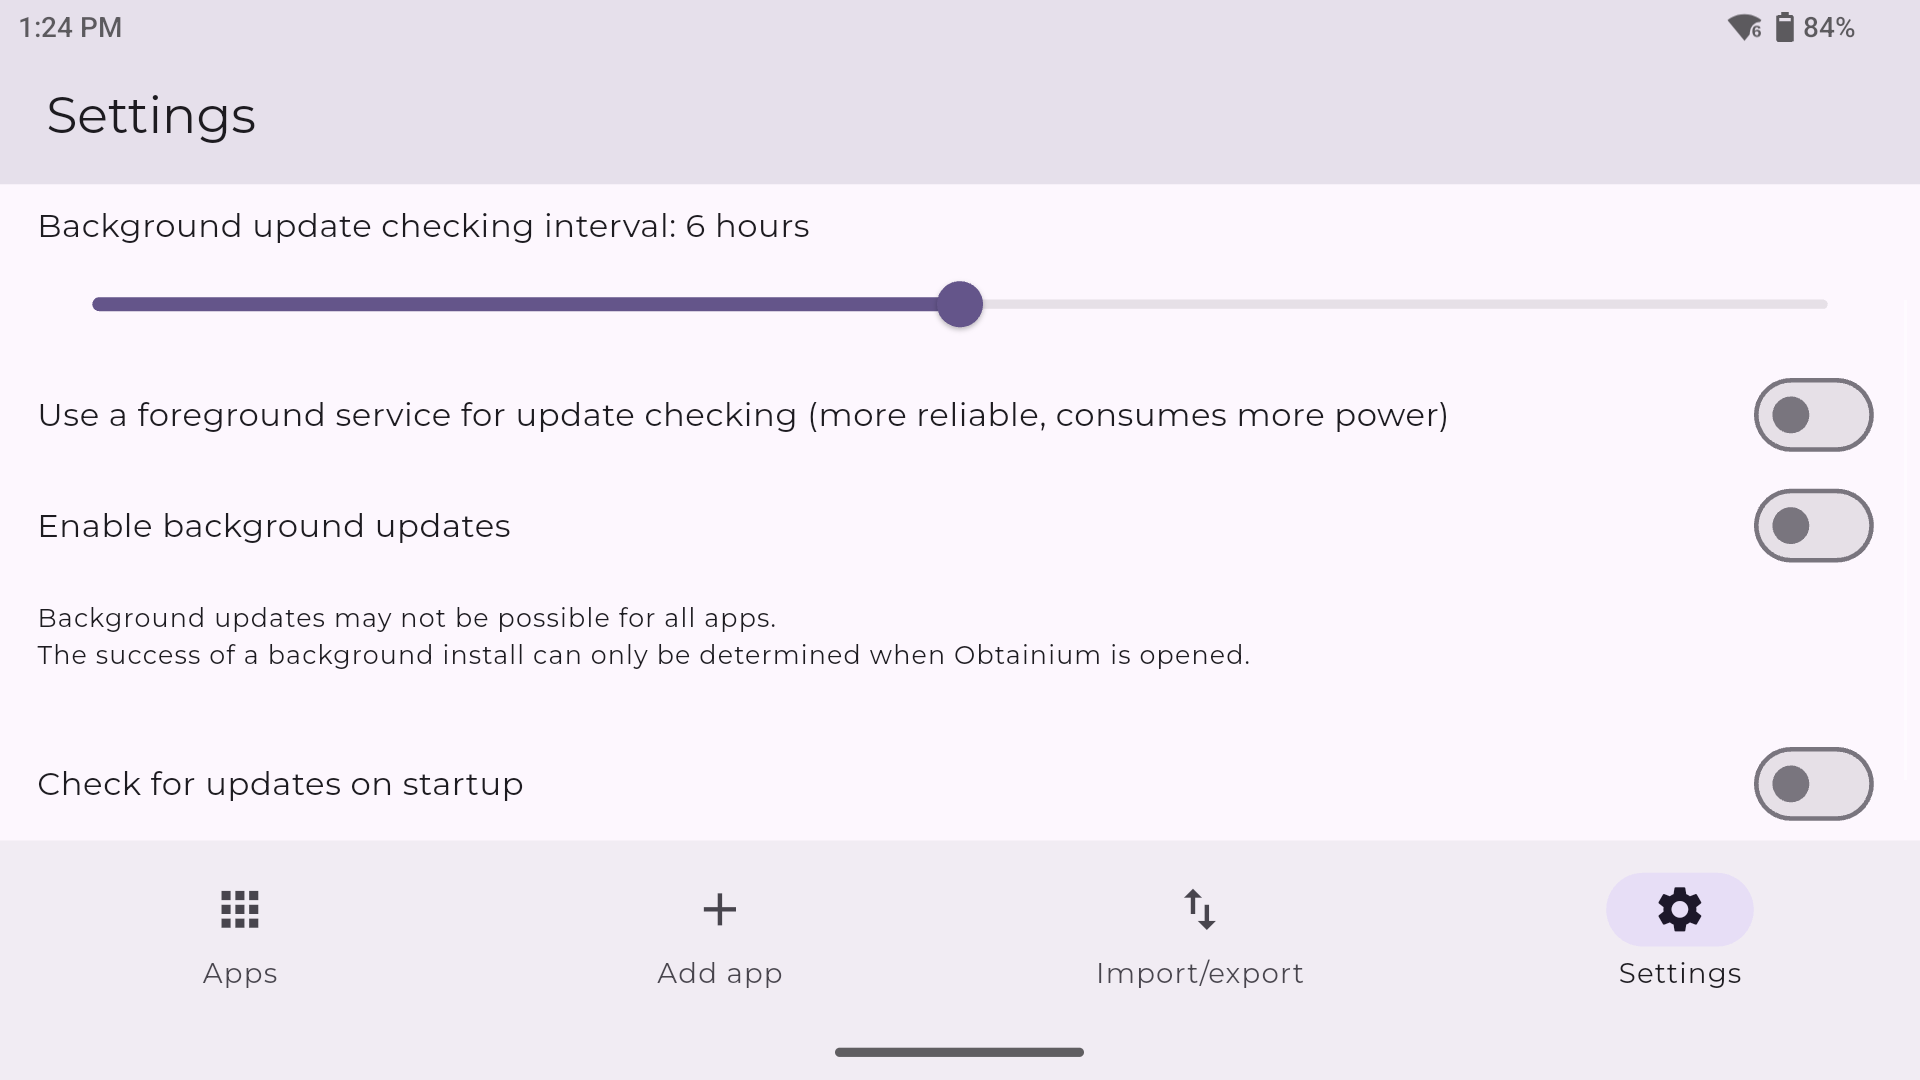
- From here, it’s just a matter of selecting the emulators and programs that you’d like from the main Apps section of Obtainium and hitting the install button. Configuration options within Obtainium allow you to set how you’d like the program to handle updates. You can set update check intervals, background installations, and much more.

If you have any interest in additional community configurations for Obtainium (beyond just gaming), you can check out the community configs page of the Obtanium project.
Dual-Screen Emulators

Now, following the steps for Obtainium above, you’ve got a bunch of emulators and apps. Apps like melonDS, Azahar, and Cemu will be on that list, but I’m going to mention a couple of forks and alternatives below. Namely, because they’re ones that take advantage of both screens:
Nintendo DS
When it comes to DS emulation, melonDS is the favorite by far, and the DualDS link below was created by user SapphireRhodonite and supports dual-screen devices like AYN Thor and AYANEO Pocket DS. This is the recommended version to snag if you’re using this guide. DraStic is also an option, and works well enough, but support dried up for this app a long time ago. Again, the specialized build below provides support for dual-screen devices.
Nintendo 3DS
When it comes to 3DS, Azahar is the current favorite. Azahar was created by merging a fork of Citra and Lime3DS to become the (arguably) definitive 3DS emulation platform. Azahar Plus is a fork with some extra features (like compatibility with more file types), AzaharDS is a fork made by the same user who did the melonDualDS above, and Citra MMJ is an older 3DS emulator that still provides better performance for some users.
Wii U
While I personally don’t use Wii U emulation (seriously, outside of Wind Waker HD, they’ve all been ported as better versions to the Nintendo Switch), some users love it. Cemu is the emulator of choice here, with CemuDS being yet another brought to you by SapphireRhodonite, and the recommended choice if you’re following this guide.
BIOS Files
While the installation of the above programs will get you most of the way to your goal of playing games, some systems (most notably disc-based) require a BIOS in order to actually run the games. Systems on RetroArch will be covered, but anything additional (PS2, GameCube, Saturn, Switch) will require some additional file placements.
Unfortunately, I cannot tell you where to find BIOS files; Google search is your friend. However, I can show you examples below of what they will typically look like, to at least point you in the right direction.
Sony PlayStation (PSX)
PSX emulators often require BIOS files to simulate different regions (NTSC-U, NTSC-J, PAL). There are various versions of each BIOS firmware for each region, but the formatting will be similar to that listed below. BIOS ending in 00= Japan, 01 = North America, 02= Europe.
scph1001.bin(USA)scph7502.bin(Europe)scph1000.bin(Japan)
Sony PlayStation 2 (PS2)
PS2 BIOS files usually come in a set, but the main file usually follows the scphXXXXX.bin format.
scph39001.bin(USA)scph30004R.bin(Europe)scph-70012.bin(Slim models)
Sega Saturn
Saturn BIOS files are strictly region-locked, so you usually need the specific BIOS for the game you are trying to play.
sega_101.bin(Japan)mpr-17933.bin(USA/Europe)
Nintendo Game Boy Advance (GBA)
While some emulators emulate the BIOS via high-level emulation (HLE), using the actual file increases accuracy.
gba_bios.bin
Nintendo Switch
Switch emulation relies entirely on decryption keys and firmware files dumped from a Switch console. Without the keys, the emulator cannot read dumped games.
prod.keys(The keys to the console)Firmware(Obtained from official Nintendo servers).
Nintendo GameCube (Dolphin)
Dolphin does not strictly require a BIOS to play games (it simulates the OS). However, if you want the nostalgic spinning cube startup animation or the system menu, you need the IPL (Initial Program Loader).
Sony PlayStation 3 (RPCS3)
The PS3 emulator doesn’t use a dumped .bin file. Instead, it uses the official system update file provided by Sony, which the emulator “installs.”
PS3UPDAT.PUP- You can actually download this legally from the official PlayStation website (it is the standard system PS3UPDATXX.bin file).
Sony PS Vita (Vita3K)
Similar to the PS3, Vita3K requires you to install the official firmware. It also requires a separate “Font Package” to render text correctly.
PSVUPDAT.PUP(System Firmware)PSP2UPDAT.PUP(Font Package)- Also downloadable from official Sony servers.
If you’re interested in dumping the BIOS from your own console, there are linked instructions on the EmuDeck site.
Choosing a Launcher or Frontend
This one comes down to preference; do you want a launcher that uses both screens on your Pocket DS, or a launcher that just uses one? There are plenty of solid options for a single screen frontend like Daijisho or Beacon Game Launcher, but it feels right to focus on frontends with dual-screen support for this guide.
Note: Yes, the device comes with Odin Launcher as a bespoke frontend. No, I don’t like it.
Cocoon

Cocoon Frontend (or Cocoon FE) is the new kid on the block, a frontend that specializes in dual-screen devices but is still in a beta phase. It’s pretty awesome, especially if you’re willing to take the time to set it all up with custom designs and looks. I’ve been tinkering on it with my AYN Thor, and I enjoy it quite a bit.
Additional Options (Dual-Screen)
- iiSU (Free, currently in Alpha)
- Console Launcher (Free, dual-screen support starting with beta 7.0)
- ES-DE Companion (in development)
Streaming Apps

This is going to depend entirely on your personal desktop/gaming PC and your home network, but the one that works the best for me is Artemis. Install Apollo on your streaming PC, and Artemis on your AYN Thor, and follow this guide to get things running.
Moonlight/Sunshine is also an option, of which Apollo and Artemis are forks, and may work better for you depending on your home network situation. I just prefer and have had better experiences with Apollo and Artemis.
PC Emulation

If you followed the previous Obtainium section, you’ll have access to both GameHub Lite and GameNative. These are the two biggest apps in the Android PC Emulation space right now. GameNative, which is my preferred PC emulator, gives you access to your entire Steam library, including cloud saves. Our own Jim has an excellent How to Play Steam Games on Android guide if you want to set up GameNative.
Some people have more success with some games in GameHub Lite than GameNative, and vice versa, so feel free to download both and play around to see what works for you.
Additional Recommended Apps
Mjolnir is a functionality app that allows you to customize what happens when you press the Home button on the AYN Thor. You can set certain button presses to open specific apps or frontends, take pictures of both screens at once, and many other things. This one comes with the dual-screen version of that Obtainium Emulation Pack from before, by the way.

CHDroid allows you to convert ROM files into a compressed .chd format on the AYN Thor itself. Most disc-based games, like PS2, Sega Saturn, Dreamcast, and PC Engine CD, can be converted to .chd and save a ton of space.
Improve the Audio
Now, there have been many AYN Thor users who have noted that the device has less-than-ideal audio coming through the device. There are a couple of options available via the AYN Discord that can help solve this.
- Firstly, user amphy has provided an improved Sound EQ that greatly improves the sound on the AYN Thor without rooting the device.
- If you want to try and get even more improved quality, then Bragi is a JamesDSP settings profile provided by user Calyxis that enhances the quality of music and voices on the AYN Thor.
Quick Tips and Tricks
Pick Which Screen Opens an App
Sometimes, an app won’t open on the correct screen. Or, the app icon is only on the bottom or top screen, and when you open that app, it will default to that screen. To change this, try the following:
- Long-press an app from either the Home Screen or App Drawer
- Tap Screen Launch
- Select one of the following
- Auto
- Top Screen
- Bottom Screen
AYN Menu

Now, did you notice the dark grey button on the chin of your AYN Thor, underneath the bottom screen? Did you even know it was a button? Press it, and welcome to the AYN Menu.
Note: If you long-press it, it’s a shortcut to turn off the bottom screen.
Mode
Mode mainly focuses on your screen orientation and what each of those screens are doing.
- You can adjust if the top screen, bottom screen, or both screens are displaying content
- You can adjust the brightness for the top screen, bottom screen, or both screens
- You can adjust the volume for the top and bottom screen (useful if you’re multitasking)
Task
Task works like a Task Manager, or swiping up from the bottom of your screen if you use Gesture Navigation. This will bring up a list of any open apps or programs, along with showing you which screen they are currently minimized on.
Settings
Settings is basically a monitoring and performance panel for your AYN Thor. You can see several useful pieces of data here.
- FPS Monitor
- CPU Temperature
- Fan Usage Percentage
- CPU Load (in GHz)
- GPU Load (in MHz)
- Power Used (in Watts)
- RAM Load (in GBs)
Take notice of the nine (you might need to swipe over one) purple or black icons at the top-right. These can be enabled and disabled, and often come with additional options:

- Auto-Lock (screen selection)
- Performance Mode
- Standard
- Medium
- High
- Fan Control
- Quiet
- Smart
- Sports
- Clean Memory (clear background processes)
- Handle Style
- Xbox Layout
- Standard Layout
- Ban On Use
- Direct Power Supply (bypasses charging the battery)
- Vibration
- Ambient LED (control the joystick LEDs)
- Force Landscape
Set Bottom Wallpaper Only
- Long-press on an empty space on the Home Screen.
- Tap Wallpapers.
- Select Wallpaper & Style.
- Tap Change Wallpaper.
- Select the app or album that your wallpaper is in.
- Locate and select the wallpaper.
- Tap the Apply button in the top right corner.
- From the menu that appears, tap the Only bottom screen button.
There are a few other ways that you can change the wallpaper, such as Settings > Wallpaper. Another way is just by opening the built-in Gallery app, finding the wallpaper you want, then tapping the Only Bottom Screen button in the top right corner.
“This Fuzzy White Line Scrolls Down Both My Thor Screens Periodically”

This is AYN’s version of a burn-in reducer for the OLED screens. It usually only occurs during periods of inactivity, lasts for five seconds, and can be exited by touching one of the screens.
“Why Aren’t My Controls Responding?”
This is going to be a common issue for many of us until we get used to using a truly dual-screen gaming handheld. Say you’re trying to play a game on one screen. You hit pause and step away for a minute, only to come back and realize nothing is working.
This is because the controller is only recognized by the last screen that you physically interacted with. So if you pulled up the Quick Menu on the bottom screen to change performance modes, then left and came back later, the controller is focused on the bottom screen. While a bit annoying, the fix is easy enough:
Simply tap the screen that you want to control, and the Thor will recognize the correct screen.
How to Update Your Thor
To process an OTA (Over-the-Air) update for your AYN Thor, follow these steps:
- Go to your general Settings menu (not Thor Settings)
- Scroll down and find System
- Scroll down and find Thor OTA
- If a new version is available, click the large, circular Download icon
- If a new version is not available, when you click Check Version, it will tell you that you’re on the latest version
- Your download will start (this can often take several minutes)
- Once complete, it will ask if you want to restart immediately. Select OK.
- Your Thor will restart, and you’re on the newest software!
Thor Settings
To find the Thor settings, pull up your device settings (Swipe down from the top of the screen twice, then select the gear icon), then scroll all the way to the bottom. Thor settings will be third from the bottom.

- Vibrator Strength Settings
- Highest / High / Medium / Low
- Charging Settings
- Charging Limit
- Charge Separation
- Video Output
- Mode (DisplayPort over Type-C)
- Adaptive
- 4K (60Hz)
- 2.5K (144Hz)
- 2K (120Hz)
- 1080p (60Hz / 120Hz / 240Hz)
- Turn off handheld console’s screen
- No auto sleep
- Sound output when connected
- Mode (DisplayPort over Type-C)
- USB Setting
- USB Connection Notification
- Network
- Status Bar Shows Current Internet Speed
- Controller Settings
- Style
- Xbox / Standard / Ban On Use
- L2/R2 Mode
- Analog / Digital / Both
- BACK Key Mapping
- Mode / App Switch / Home / Select / Start
- A / B / X / Y / L1 / L2 / L3 / R1 / R2 / R3
- Up / Down / Left / Right
- None
- Joystick Calibration & Gamepad Test
- Prevent Accidental Home Button Press
- Style
- Virtual Mouse
- Enable/Disable
- Google Services
- Register Google Services
- Advanced Settings
- Virtual RAM Swap
- Disable Apps
- App Auto Launch Manage
- Whitelist Application
- Exclude Key Focus Application
- Enter Setup Wizard
- Enter Factory Test
- Forse Start selinux
- Run Script as Root
- Factory Settings
File Transfer: Solid Explorer

My go-to file transfer program has been Solid Explorer for a long time now. I enjoy the split-screen default, the layout, and the ease of copying and moving files. This one is not optimized for dual-screen devices, so you’ll just have it displaying on the top or bottom screen. Worth mentioning that this is a paid app ($5.99, though there is a 14-day free trial).
If you prefer a free option, MiXplorer is one that my colleague Nick has recommended before. It’s free, with a premium version called MiX Silver available.
Conclusion
The AYN Thor is a great dual-screen device, evidenced by the community fervor when you mention the name. Hopefully, this guide provided you with the tools necessary to enjoy your AYN Thor to the fullest, and we will continue to update this guide with more fun updates and projects as we come across them.