Greetings friends and fellow enthusiasts! This is Mikhailov from Team Retrogue, where we like retro games and the devices that bring them to us. In this article, I’m going to give a detailed, written tutorial on how to set up the Playnite frontend on your WIndows PC or Handheld. This written review is designed to supplement my video tutorial, and you can find that video below.
Initial Installation
Before setting up Playnite, I highly recommend you set up EmuDeck for Windows. The program just recently came out of beta, and will make setting up your Emulator and ROM configurations that much easier. You can download EmuDeck from the following link: https://www.emudeck.com/
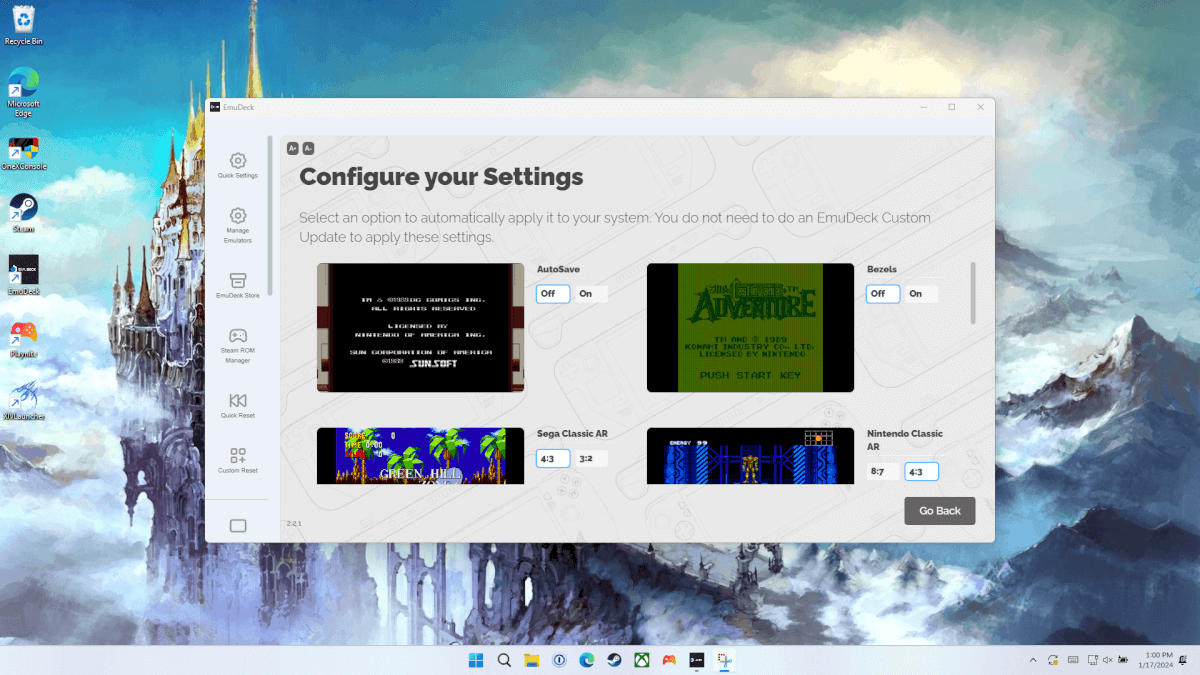
This is the Emudeck Home Screen once you have completed your initial setup. You will be prompted several times during the installation process.
You can download and set up Playnite using the following link: https://playnite.link/
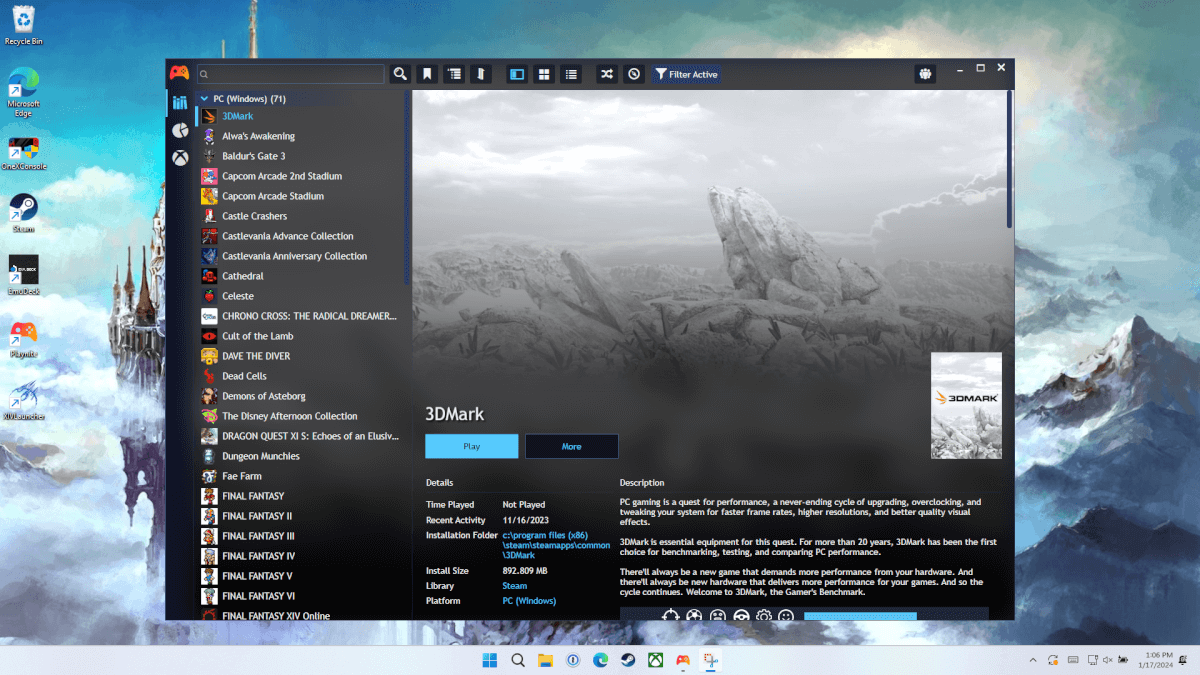
The Playnite Home Screen will look something like this. Note the big orange controller in the top-left. That icon is your menu access and you will be going there often during setup.
The remainder of this guide assumes you have placed your ROMs and BIOS folders in the appropriate place in EmuDeck. If you haven’t done this yet, find the “Emulation” folder in your EmuDeck install directory. There is a subfolder for BIOS files and a subfolder for each system you may have legal backups of. Playnite will scan these folders and add shortcuts to the proper emulator in order to open these games. You will need to source your own BIOS and ROM files.
We’re now going to link EmuDeck to Playnite. Remember that big orange controller icon on the top-left of the Playnite menu? Let’s click on that.

In this add-on section, there’s an area at the bottom called “browse”. Now this section can get a little overwhelming because there are a ton of different categories such as “libraries” and “metadata”. We will get into a few of those features later, but for now, let’s head down to the section titled “Generic” and select the EmuDeck add-on from the list in that category. From there you can click “install” to link EmuDeck to Playnite.

Once installed, you will be asked to pick your EmuDeck installation folder. Now if you’re a doof like me and you picked the wrong directory, you can actually go into the extension settings under add-ons to manually change the directory of your EmuDeck install. You need to make sure you pick the directory where your ROMs and BIOS files are located, not the actual EmuDeck install directory.
Now that EmuDeck is connected to Playnite, head back to that big orange controller and click “update game library.” This will now add shortcuts to all of your ROM files to Playnite. It may take awhile depending on the size of your ROM library, and the program is going to look like a mess for a bit. Worry not, friendly reader. We will make it look pretty.

Scraping Metadata
Next, we’re going to download two different metadata sources: Screenscraper and Steam Grid DB. You will need free accounts in order to use both sources, and you can create those accounts from the following two websites;
Screenscraper: Screenscraper.fr
Steam Grid DB: Steamgriddb.com
Once you have registered and logged in appropriately, we’re going to navigate back to that big orange controller icon in Playnite, and click “add-ons” again. This time we are going into the “Metadata” subcategory. Download both the Screenscraper and Steam Grid DB add-ons and restart Playnite when prompted.

Once installed, and Playnite is reloaded, head back to the “add-ons” tab. Let’s navigate to “Extensions settings”, where you can add your Screenscraper and Steam Grid DB accounts.
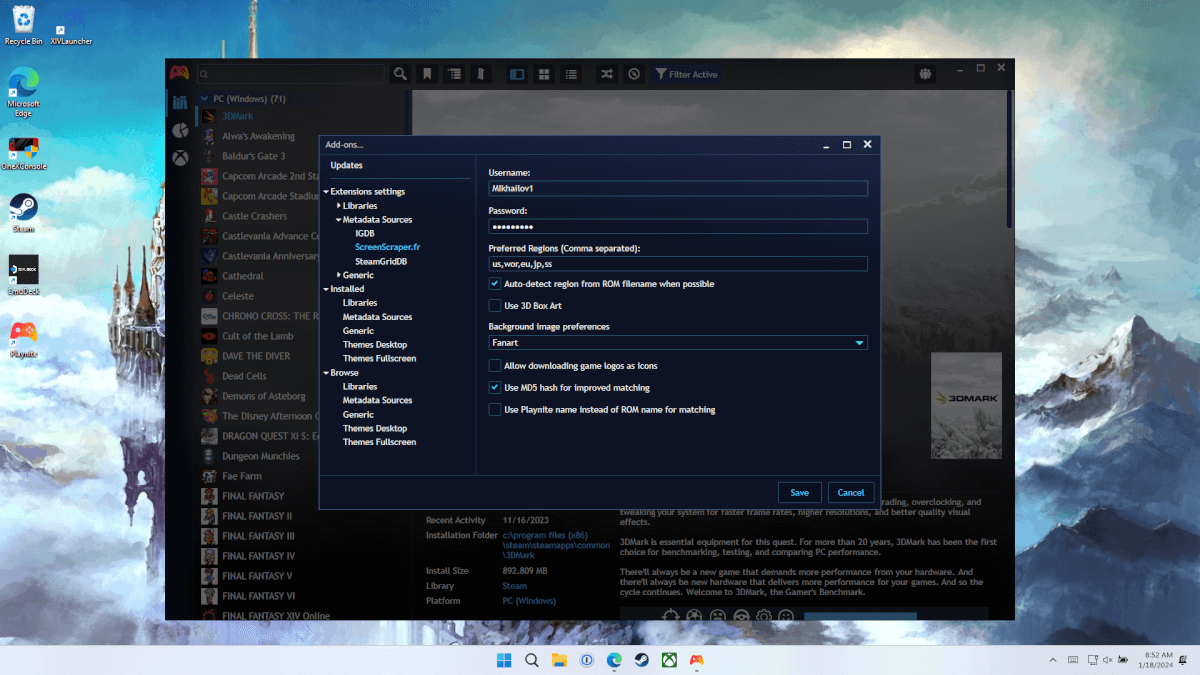
Enter your Screenscraper credentials in this menu.
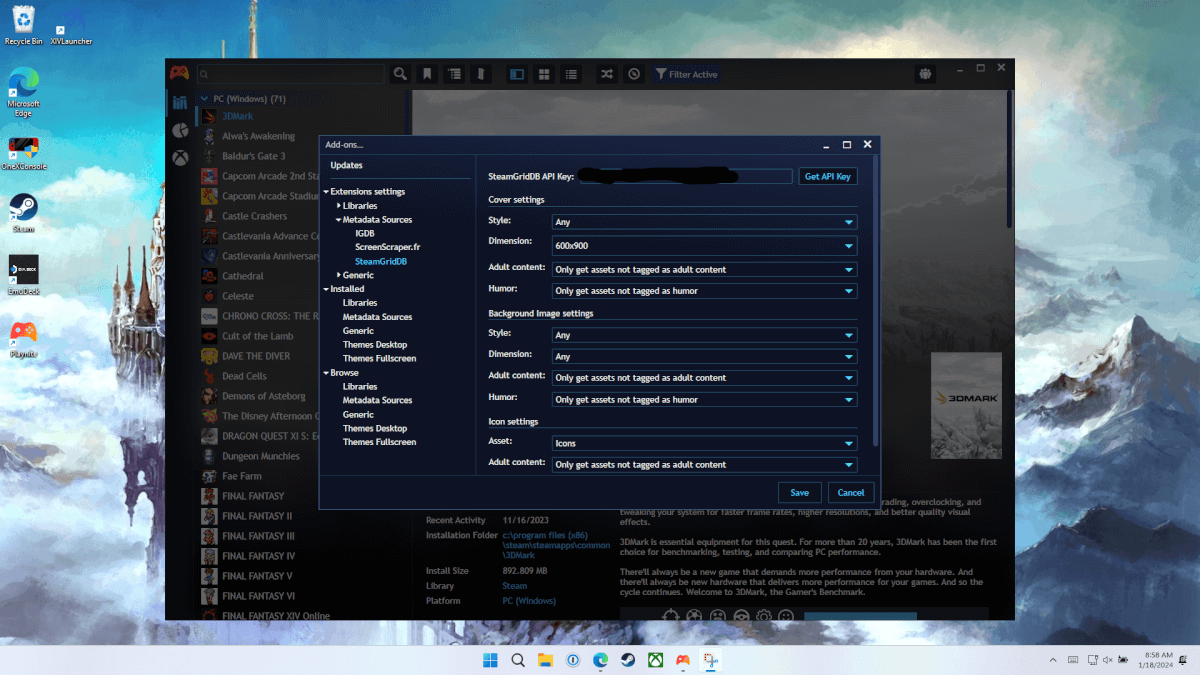
You will need your Steam Grid DB API Key in order to scrape metadata from this source.
The next step is to create filters for all our game systems, and scrape appropriately. This article will demonstrate using Super Nintendo, but you will have to do this with each system you wish to play ROMs on. You can also do this with Steam and with other PC Game stores.
Click the filter button to bring up the filters menu. The button is circled in the image below:

In the menu that pops up on the right, go to the platform tab, and click the platform you want to scrape box art for. In this case, Super Nintendo.

Once you activate the filter, you will notice that only Super Nintendo games are filtered out on the left of your screen. You will now need to manually select all of the games. Click the top one, hold the shift key on your keyboard, and press the down arrow until all of the titles are selected. Click that shiny orange controller again, then select “Download Metadata.”

There are a bunch of menus here. So let’s take it one step at a time. First, click “selected games only” and uncheck “only download missing metadata”.

On the next page, select your metadata sources as pictured below. You’re going to set your cover image, icon, and background image to scrape from Steam Grid DB, and everything else from Screenscraper.

Click download metadata and let the program do its thing. Once finished, you can then create filters for your other game systems and repeat this process until your boxart is properly scraped. Creating and saving your filters is very important for when we get into Fullscreen mode.
Manually Adding Games
There are a few games that you might have to add manually. In this example, I am going to add XIV Launcher. This application is not part of any storefront or emulation frontend, and you might run into a situation where you have to manually add a program to Playnite. To do this, we are going to pretend to add a Microsoft Store application. This will actually pull up a list of installed apps on your computer that may not necessarily be from the MS Store, but are in your Program Files folder. Time to head back to the shiny orange controller icon. Click that, then navigate to “add game” and then “Microsoft Store Application.”

Now click “Scan Folder” to pull up the file manager, and browse to the location of the program, app, or game you wish to add to Playnite. Make sure you navigate to the folder where the actual executable (exe) file is located.


Then it’s as simple as adding the program. If you want to scrape box art and metadata, you can use the same method used earlier in this article.

Themes, and Fullscreen Mode
Time for the final step in this lengthy guide: setting up themes and Fullscreen mode. Remember when we created all of those filters? Well that is going to come into play when setting up our themes. One thing you may want to check is what you saved the themes as. You will need to adhere to a specific naming convention. Most themes use the format below. Just make sure your filters all share the same naming convention or theme logos won’t work.
Atari
Atari 2600
Atari Jaguar
Battle Net
EA Play
Epic Games Store
Game Boy
Game Boy Advance
Game Boy Color
GOG
itch.io
MAME
Moonlight
Nintendo 64
Nintendo 3DS
Nintendo DS
Nintendo Entertainment System
Nintendo Gamecube
Nintendo Switch
Nintendo Wii U
Nintendo Wii
Nintendo
Nvidia Gamestream
Origin
PC
Playstation 2
Playstation 3
Playstation 4
Playstation 5
Playstation
PSOne
PSP
PS Vita
Prime Gaming
Rockstar
Sega
Sega CD
Sega Dreamcast
Sega Genesis
Sega Genesis 32X
Sega Master System
Sega Mega Drive
Sega Mega Drive 32X
Sega Saturn
Sega Saturn JAP
Super Nintendo
Steam
TurboGrafx-16
Ubisoft Connect
Windows
XBOX 360
XBOX Classic
XBOX Games Pass
XBOX Series X
XBOX
XCloud
Once we have our filters sorted out, time to go back to the add-ons tab. This time we are going to browse fullscreen themes. For this example, I am going to use Reskin XBOXSX. Simply install the theme and restart Playnite as necessary.
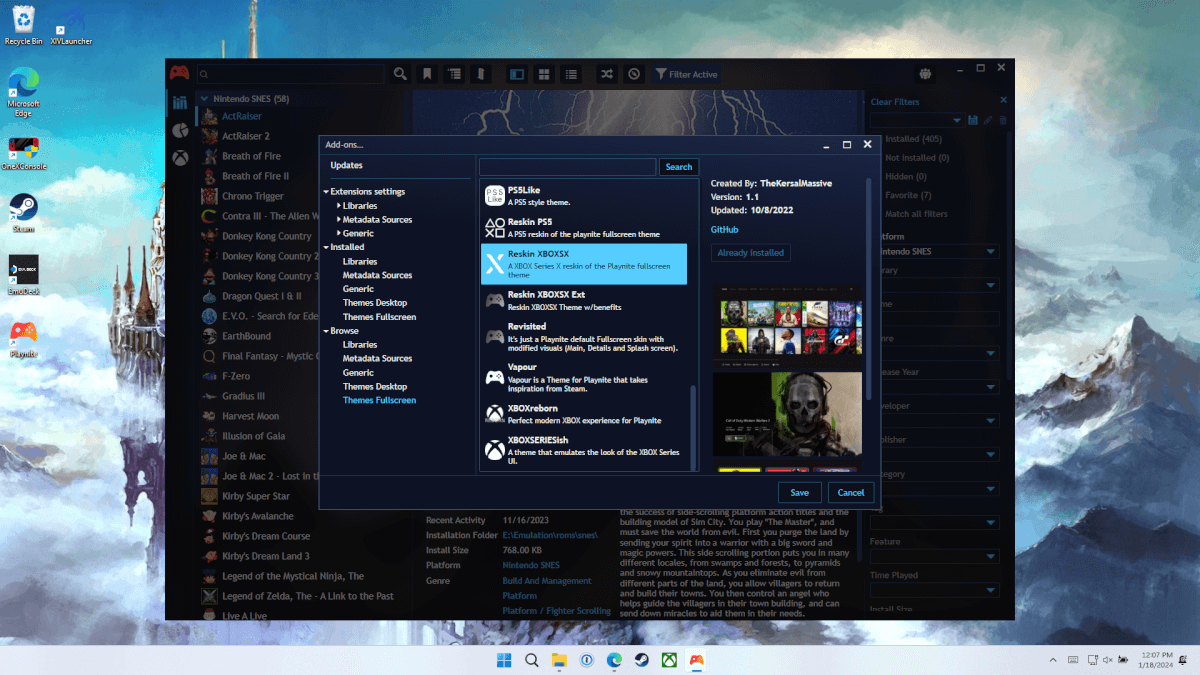
Now when you switch Playnite to fullscreen mode, you are treated to a beautiful theme with all the great boxart we scraped. This theme has full controller support and all menus can be accessed with a controller.

I bet you want this beautiful theme to show up when you start up your system, right? Let’s set that up next. Let’s go back into the orange icon one more time, and go into “Settings” Make sure “Launch in Fullscreen Mode” and “Launch Playnite when Computer is Started” are both checked, and save your settings.

Congratulations! Playnite is all set up and ready to go on your Windows device of choice!
Want to see more tutorials and reviews? You can subscribe to my content on YouTube here: Team Tetrogue
What did you think of this article? Let us know in the comments below, and chat with us in our Discord!
This page may contain affiliate links, by purchasing something through a link, Retro Handhelds may earn a small commission on the sale at no additional cost to you.
