The Powkiddy V20 is one of the first releases offering the new Allwinner A133P standard for budget handhelds. Over the past few years, the R36S and its many imitations have been a solid starting point for those looking to get into retro handhelds.
With capable internals that offer solid compatibility with most PS1 games, the barebones R36S became a gateway into the hobby, making handheld gaming more accessible to newcomers at a budget-friendly price.
Now, devices are moving away from the Rockchip RK3326 found in most R36S clones, and onto the Allwinner A133P that we see in devices like the TrimUI Smart Pro and Brick and MagicX Mini Zero 28. The chipset is a bit more powerful, offering nearly full compatibility with all PS1 titles, and can deliver 720p over a 16:9 aspect ratio like in the aforementioned TrimUI Smart Pro.
The V20 uses the same processor, and pairing it with the budget history of Powkiddy, the device may become a standout and future recommendation for those looking to venture into the retro handheld space.
Table of Contents
Getting Started
Booting up your V20, you’ll be presented with the Powkiddy logo, followed by a standard Batocera UI.The device comes preloaded with games, but they share the same issues common to other handhelds — low-quality rips, strange naming conventions, and occasional titles that simply don’t work..
So, this guide will at least show you how to get your bearings straight when it comes to taking full control of the device. If you wish to delete all of the games, I’ll show you where they’re stored. Want to add more? Well, same place, same answer.
What You’ll Need
-
- Windows PC
- macOS and Linux PCs are fine for everything except flashing firmware
- Powkiddy V20
- Micro SD Card
- SD Card Reader
- Windows PC
Buy the V20 at PowkiddyBuy the V20 at AliExpress
microSD Cards
SD Card Readers
The only note about the needed add-ons comes by way of the USB-C cable. Currently, using USB-C to USB-C cables to charge the device does not work. Most of these handhelds lack the 5-ohm resistors necessary to make charging via USB-C to USB-C possible. That being said, Powkiddy is also one of the most budget-first companies in the retro handheld world. Wherever costs can be cut without a major sacrifice to performance or usability, Powkiddy will usually take that plunge.
USB-C Cables
Firmware
The Powkiddy V20 firmware flashing process is slightly different than other devices. You are flashing files the exact same way, but the process you go about doing it requires a different app and could result in some pretty jarring errors if not prepared beforehand.
Before we get started, there are two files that you will need to download:
As a reminder, this only works on Windows PCs since PhoenixCard does not have apps available for any other OS. Running this through a virtual machine might work, but I would strongly advise against it.
Download the firmware and Phoenix Card app from above. It will download a .zip file, and you know what we love to do with a zip file. Extract that sucker.
Windows can natively extract zip files, but you also have the option of using 7-zip as we do in any guide written by yours truly. However, for the sake of simplicity, we’ll just extract it via normal means.
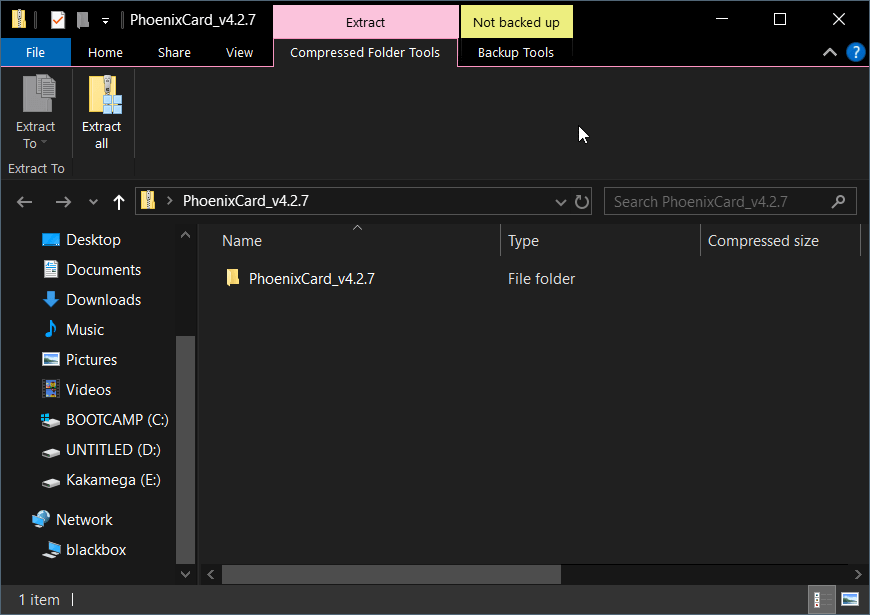
Right-click the file, and at the top of the menu that pops up, hit Open. You’ll see a list of all the files within the zip file, but that’s not enough. In the upper lefthand corner, you should see Extract All. Go ahead and hit that.
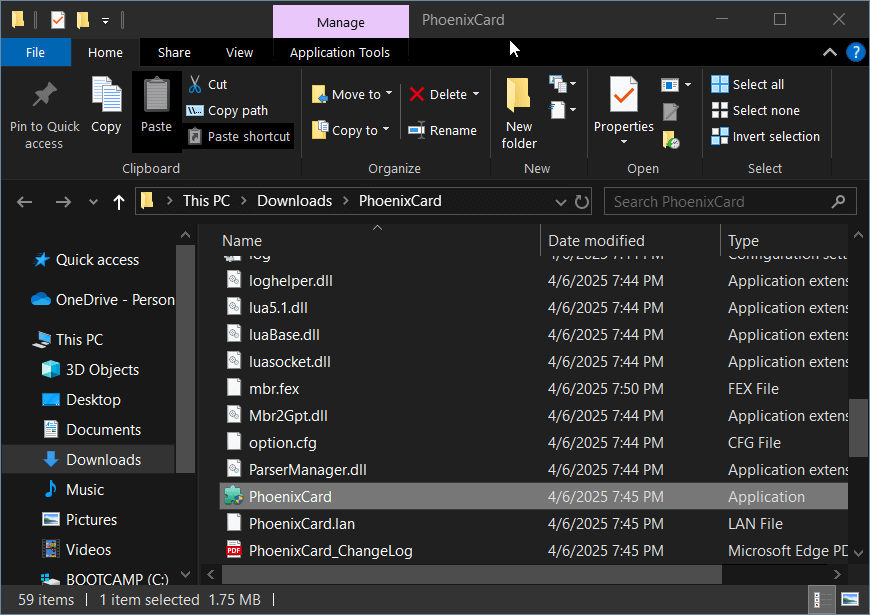
Once everything is extracted, you’ll want to browse through the files and navigate to the Tool folder, and inside, you should find the PhoenixCard app.
Flashing the stock firmware onto your SD card is ultimately the same as it is in any other app, but we have to use PhoenixCard here due to the sight differences in how the A133P reads external storage.
There’s a short list of three things you need to verify before we get to flashing an SD card.
-
-
-
- Click the Image button and find the downloaded firmware .img file from above.
- Make sure the Start up option is selected.
- Select your SD card in the list that shows in the middle of the app.
-
-
After doing those three things, go ahead and hit Burn near the top, to the left of Restore and Refresh Drive.
After a few moments, PhoenixCard will say “Burn End…” and you will have successfully flashed the needed V20 firmware onto your SD card.
Now, we’re not done yet. The next bit is crucial.
Boot up your V20 with the SD card inserted, and let it go through all of its various splash screens and menus. After awhile, you will receive an error saying Batocera “cannot find any systems.” This is expected, there is literally nothing of use on your SD card just yet.
Turn off your V20, and plop the SD card back into your computer. Now, you should see a new partition or drive called GAMES and inside, a roms folder, and inside that, all of the shorthand console names.
Put some games in those folders, or literally one game inside of one respective console folder, boot your V20 back up, and you should be golden — fresh install of Batocera on the V20 with your own, sanctified, legal backups.
ROMs and BIOS Files
Adding ROMs to the Powkiddy V20 is as standard a process as it is in any other console. In short, plop your games in their respective console folders, and they should appear within Batocera’s console menus.
Unlike some other Linux based handhelds, the games on this device are stored on a separate partition titled GAMES. However, if you’ve replaced the supplied SD card with one of your own, and flashed the firmware onto it as detailed in the Firmware section, then your games will reside in the GAMES partition, but then inside of a roms folder within that.
Inside, there will be a plethora of folders, all named specifically after the console the games are meant to be played on. For example, gb should hold all of your legally backed up .gb Game Boy games.
Below, I have two pictures showing the difference in location.
- Default SD card GAMES partition
- Reflashed firmware GAMES partition
Now, you have a second, somewhat easier option as well.
After installing and booting into Batocera for the first time, you should see a partition or drive titled SHARE. Within it, a bunch of folders. The roms folder will not be populated, but, if you wanted to, you could drag all of the folders from the GAMES partition and copy them to this separate roms folder and end up with the exact same result — games to play on the V20.
Inside the SHARE partition, you will see a folder called bios. I will give you one guess what goes into this folder.
We’ve compiled a list of commonly used BIOS file names — these are just the most popular ones you might need to improve compatibility across the various consoles you’re trying to emulate.
BIOS File Names
- DS / DSi
- bios7.bin
- bios9.bin
- firmware.bin
- dsi_bios7.bin
- dsi_bios9.bin
- dsi_firmware.bin
- dsi_nand.bin
- Game Boy (Optional)
- gb_bios.bin
- Game Boy Advance (Optional)
- gba_bios.bin
- Game Boy Color (Optional)
- gbc_bios.bin
- Sega CD
- bios_CD_E.bin
- bios_CD_J.bin
- bios_CD_U.bin
- Dreamcast
- dc_boot.bin
- dc_flash.bin
- naomi_boot.bin
- Saturn
- Kronos
- saturn_bios.bin
- Beetle Saturn
- sega_101.bin
- mpr-17933.bin
- Kronos
- PS1
- scph5501.bin
- PSP
- PSVUPDAT.PUP
- PSP2UPDAT.PUP
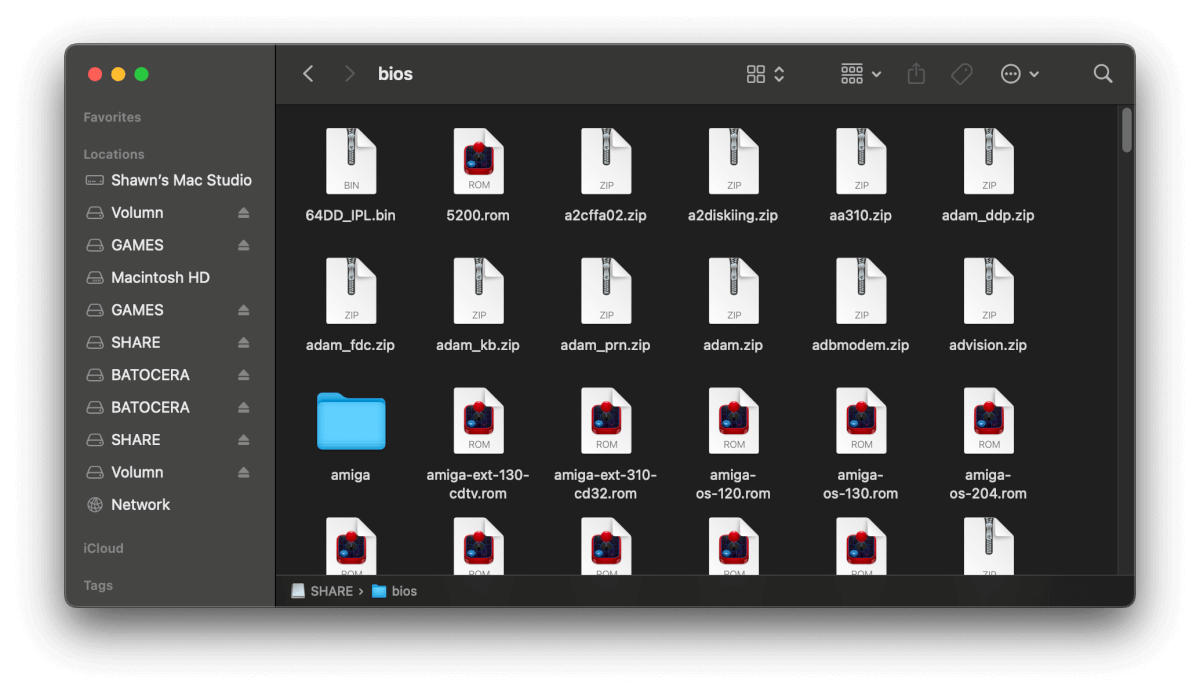
Powkiddy ships their devices with BIOS files preloaded on the SD card. Here’s an image of what a populated bios folder looks like when looking at the shipped card directly from Powkiddy.
Backing up this folder for safekeeping can make it easier to source BIOS files in the future. These files can be difficult to find, and while we cannot and will not provide them ourselves, we want to make you aware of this option as a potential resource.
Once you have games in their correct system folders and BIOS files in the bios folder if necessary, you’re ready to lock in and start playing your favorite games on your new handheld.
Themes
Themes are also a fairly standard affair. The Powkiddy V20 doesn’t veer too off-center from standard; the screen has a 4:3 aspect ratio with a 640 x 480 resolution. Naturally, any downloaded themes should also support 4:3 and a 480p resolution. Luckily, most themes should scale appropriately and not present any problems.
Batocera has an official repository hosted here. Download the themes you’d like, or ones you’ve found elsewhere online, and place them in the SHARE > themes folder.
After rebooting or restarting EmulationStation, you can change the theme by pressing Start on any menu to open up the device’s Main Menu, then User Interface Settings, and the Theme Set option should show you all of the various themes you have at your disposal. By default, there should be five: Canvas, Epic Max, Freeplay, Neutral, and Switch Black v2. However, as explained, you can always add more.
Hotkeys
Mikhailov has created a detailed RetroArch guide right here on the site, covering how to optimize settings and tailor the experience to your preferences. From fine-tuning shaders to configuring hotkeys, there are countless ways to customize the V20 and ensure it performs exactly how you want it to, down to the smallest input nuance.
However, would this be a guide without a list of hotkeys? Probably not, so here are the standard hotkeys for the Powkiddy V20:
-
-
- SELECT + A: Pause
- SELECT + B: Screenshot
- SELECT + X: RetroArch Menu
- SELECT + Y: Show/Hide FPS
- SELECT + DPAD LEFT: Change save state slot
- SELECT + DPAD RIGHT: Change save state slot
- SELECT + VOL: Brightness
-
When using the DS or PSP emulator, the above hotkeys will not work. There, you can press the right analog stick (R3) to open up the emulator menu and access the above controls.
Once inside of a game, you can either edit, add, or straight up remove some hotkeys by opening the RetroArch menu with SELECT + X, then pressing B to bring up the sidebar menu, going to Settings > Input > Hotkeys.
By default, your hotkey bind button will be Button 8, which is your Select button on the V20. You can then further edit or add any variety of buttons to the listed actions. For example, highlighting Fast Forward (Hold), pressing A to select it, and then pressing the R2 button will make it so whenever you hold Select and press R2, the game will fast forward.
I would recommend adding a specific hotkey for save state loading and saving. Doing so can cut out a lot of the tediousness found in older games that would have you start over from a wayward checkpoint every time you die in a difficult area. You can opt to not use the save states still, but having the option can be a literal lifesaver.
Once done there, be sure to head back to Main Menu > Configuration File > Save Current Configuration. This will make sure that you don’t have to set up your custom hotkey(s) after you shut down your console.
Speaking of shutting down, the process is a little different from most handhelds made in 2025. The reliance on both Linux and Batocera makes the shut down process a bit long winded.
You should never just force your console to power off, but, truthfully, I’ve been living on the edge for most of my retro handheld career and have never had problems so long as I saved my game, either by save states or through official in-game means. It is possible to corrupt your SD card this way, though, so I wouldn’t recommend it.
To shut down from playing a game, open the RetroArch menu with SELECT + X, then scroll down and hit Quit. From there, you should be back into one of the device’s menus and not RetroArch. Press Start > Quit > Shutdown System or Fast Shutdown System.
Needing to do this every time you want to power down can be a bit frustrating, and may push you towards just forcing the device down by holding the power button. But remember, I did warn you about the possibility of corruption.
Wrap-Up
There’s not a lot to the Powkiddy V20, honestly. Not in a bad way, but it is a typical retro handheld made to play the classics some of us remember from our childhood. The device lacks onboard wifi, so we are missing out on the ease of updating and potentially moving files to and from the device via SSH or FTP. But that doesn’t make it a bad handheld, just one without those two features.
Getting into the retro handheld world, especially now, is a crazily hectic and sometimes overwhelming task. There are a bunch of devices with many different assortments of letters and numbers that equate to device names. But the V20 gives you a device that just lets you plop games onto its card and play them.
What did you think of this article? Let us know in the comments below, and chat with us in our Discord!
This page may contain affiliate links, by purchasing something through a link, Retro Handhelds may earn a small commission on the sale at no additional cost to you.


Hi Shawn
Thank you for your guide. Unfortunately the link to the firmware you posted is not working (anymore).
I’d really like to setup my V20 with a proper sdcard and my own roms. Have you got an updated link to the firmware?
Best regards
Marc
Link has been updated!
let me know how you get on, ive been struggling to get a new sd working on my v20 for a while – image seems to burn successfully and batocera does the first boot thing, but after putting the SD back into my PC, there are no other useable partitions on the card other than ‘Volumn’ – other partitions exist on the disk as shown in disk mananger, but all are ‘raw’ and no drive letters! powkiddy support is either useless or very close to it on this issue!
I’m having the same issue. If there is a different image file that works for anyone please post! Was thinking to clone the original micro SD it came with to a new card and replace all files then… Has anyone tried that?
Let me know if you can see the partitions or made them yourself… I can’t get it to work
I had the same problem with this image (no usable partitions), but fortunately found a solution to it. After burning the image with PhoenixCard, I formatted the last (biggest) partition with MiniTool Partition Wizard as fat32, clicked “unhide” so the partition gets a drive-letter that can be seen on PC and named the partition “GAMES” (you don’t have to name it). After all of that I put the card in the V20. The newly created partition got populated with some folders (roms, screenshots, themes). You can then put in your roms in the corresponding subfolders. Bios-files are already inside of a hidden partition (SHARE). I guess you could create a bios-folder inside this GAMES-partition and put your bios files there. I did not try this, as batocera found no missing bios files. Hope this helps. Have a nice day everybody.
You’re a saviour Marc! Thank you for the tip! While I couldn’t see the partitions with Minitool, I used Paragon and it worked just fine.
Shockingly, my V20 came without an SD card and hence without any OS at all. This guide and your suggestion made it work perfectly.
Cheers all!
It is not mandatory to put the large partition in FAT32, it also works in exFAT, cordially DAG11
Please guide me how to install box art for the game, thanks !
What about future releases of this firmware? How are we assured this V20 gets software support and updates?
How do i access the Bios Folder on windows?